Jenkins CI/CD with Argo CD and Vault
test -f JenkinsfileOverview
Section titled “Overview”Production-like CI/CD lab with Vault and Argo CD.
What You Will Build
Section titled “What You Will Build”Architecture Diagram
Section titled “Architecture Diagram”Prerequisites
Section titled “Prerequisites”- Install or review: Java, Jenkins, Argo CD, Vault, Docker, Kubernetes, SonarQube, Trivy.
- Use your own cloud account credentials and keep them out of commits.
- This project expects cloud resources, so verify budget alerts and cleanup first.
- Open the safety guide before running commands that create infrastructure.
Credentials And Cost Warning
Section titled “Credentials And Cost Warning”Cost risk is medium. Cloud target: AWS. Cloud credentials needed: Yes. Always use your own account, never commit secrets, and confirm cleanup before creating paid infrastructure.
Step-By-Step Lab
Section titled “Step-By-Step Lab”Use this flow before you run commands:
- Read the cost and credential warning above.
- Review the validation, troubleshooting, cleanup, and portfolio proof sections below.
- Follow the original project guide preserved near the bottom of this page.
- Return to the validation and cleanup checks before you capture portfolio evidence.
Validation Checks
Section titled “Validation Checks”Run the project validation command before and after meaningful changes:
test -f JenkinsfileTroubleshooting
Section titled “Troubleshooting”- Run
test -f Jenkinsfilefirst so local tooling issues are visible early. - If a command fails, check tool versions, working directory, and required environment variables.
- For cloud failures, confirm account identity, region, quotas, and least-privilege IAM.
- For pipeline failures, check repository secrets, runner permissions, and pinned action versions.
Cleanup
Section titled “Cleanup”No dedicated cleanup command was detected in the project README. Treat this as a warning: before provisioning anything, write down the exact delete, destroy, or rollback steps for your environment.
Portfolio Proof
Section titled “Portfolio Proof”- Validation command output:
test -f Jenkinsfile - Screenshot or terminal proof: Passing pipeline run plus scan/deploy evidence
- Notes explaining what changed, what failed, and how you fixed it
- Cleanup evidence, especially for cloud or Kubernetes resources
Original Project Guide
Section titled “Original Project Guide”The original README content is preserved here for lab-specific commands and context. Headings are intentionally demoted so the page outline stays focused on the standard lab flow.
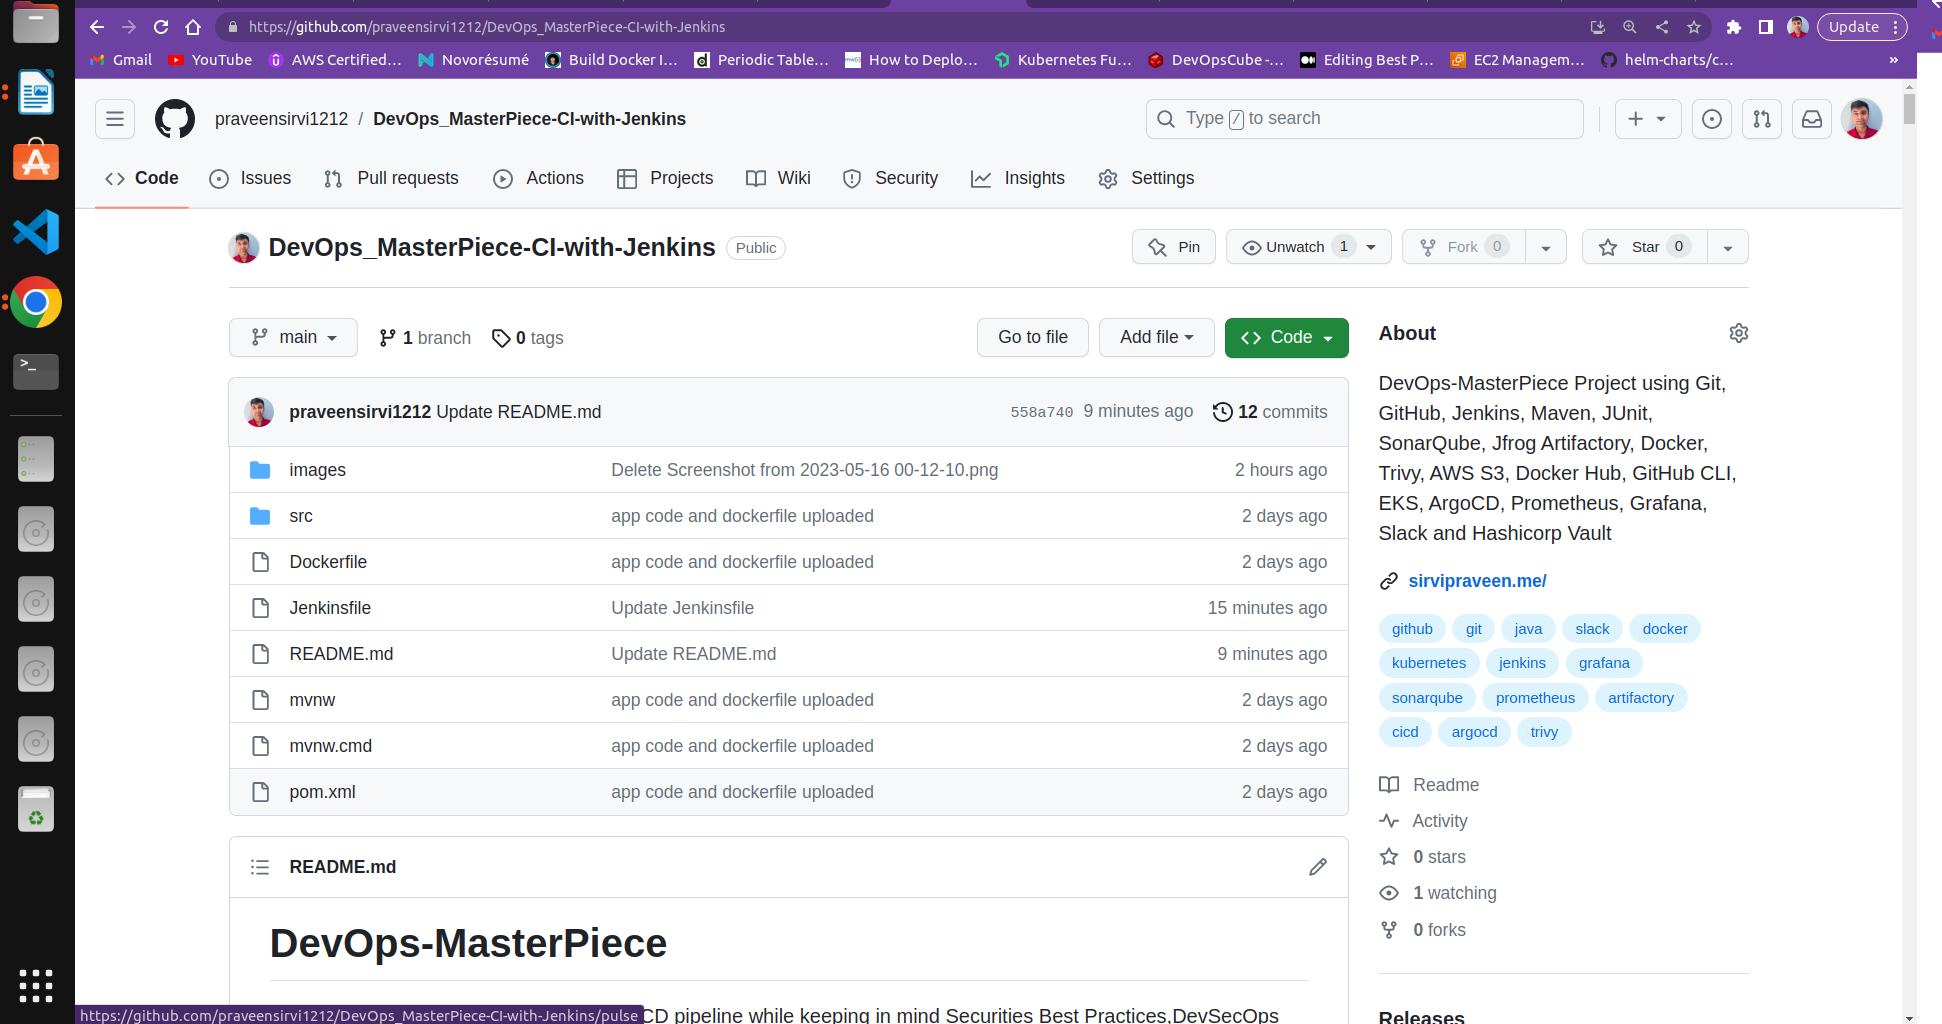
In this project, I created an end-to-end Production like CI-CD pipeline while keeping in mind Securities Best Practices,DevSecOps principles and used all these tools Git, GitHub, Jenkins, Maven, JUnit, SonarQube, Jfrog Artifactory, Docker, Trivy, AWS S3, Docker Hub, GitHub CLI, EKS, ArgoCD, Prometheus, Grafana, Slack and Hashicorp Vault, to achieve the goal.
I used Jenkins for Continuous Integration and ArgoCD for Continuous Deployment.
Section titled “I used Jenkins for Continuous Integration and ArgoCD for Continuous Deployment.”Project Architecture
Section titled “Project Architecture”
Pipeline flow:
Section titled “Pipeline flow:”-
When an event (commit) will occur in the application code GitHub repo, the GitHub webhook will push the code to Jenkins and Jenkins will start the build.
-
Maven will build the code, if the build fails, the whole pipeline will become a failure and Jenkins will notify the user using Slack, If build success then
-
Junit will do unit testing, if the application passes test cases then will go to the next step otherwise the whole pipeline will become a failure Jenkins will notify the user that your build fails.
-
SonarQube scanner will scan the code and will send the report to the SonarQube server, where the report will go through the quality gate and gives the output to the web Dashboard.
-
In the quality gate, we define conditions or rules like how many bugs or vulnerabilities, or code smells should be present in the code. Also, we have to create a webhook to send the status of quality gate status to Jenkins. If the quality gate status becomes a failure, the whole pipeline will become a failure then Jenkins will notify the user that your build fails.
-
After the quality gate passes, Artifacts will be sent to Jfrog Artifactory. If artifacts send to the artifactory successfully then will go to the next stage otherwise the whole pipeline will become a failure Jenkins will notify the user that your build fails.
-
After successful artifacts push to Artifactory, Docker will build the docker image. if the docker build fails when the whole pipeline will become a failure and Jenkins will notify the user that your build fails.
-
Trivy will scan the docker image, if it finds any Vulnerability then the whole pipeline will become a failure, and the generated report will be sent to s3 for future review and Jenkins will notify the user that your build fails.
-
After the Trivy scan docker images will be pushed to the docker hub, if the docker fails to push docker images to the docker hub then the pipeline will become a failure and Jenkins will notify the user that your build fails.
-
After the docker push, Jenkins will clone the Kubernetes manifest repo from the feature branch, if the repo is already present then it will only pull the changes. If Jenkins is unable to clone the repo then the whole pipeline will become a failure and Jenkins will notify the user that your build fails.
-
After Cloning the repo, Jenkins will update the image tag in the deployment manifest. If Jenkins is unable to update the image tag then the whole pipeline will become a failure and Jenkins will notify the user that your build fails.
-
After updating the image tag, Jenkins will commit the change and push the code to the feature branch. If Jenkins is unable to push the changes to the feature branch then the whole pipeline will become a failure and Jenkins will notify the user that your build fails.
-
After pushing changes to the feature branch, Jenkins will create a pull request against the main branch. If Jenkins is unable to create a pull request then the whole pipeline will become a failure and Jenkins will notify the user that your build fails.
-
After the pull request creation, a senior person from the team will review and merge the pull request.
-
After merging the feature branch into the main branch, ArgoCD will pull the changes and deploy the application into Kubernetes.
🛡️ 2026 DevSecOps Enhancements (What You Will Learn)
Section titled “🛡️ 2026 DevSecOps Enhancements (What You Will Learn)”This repository represents a fantastic foundational DevSecOps pipeline utilizing Jenkins, SonarQube, Trivy, and HashiCorp Vault. In a 2026 context, we emphasize the Dynamic Secrets capability of Vault. Instead of Vault merely acting as a static Key-Value store to inject AWS credentials into the Jenkins pipeline (which could still be dumped if the Jenkins runner is compromised), modern implementations utilize Vault’s AWS Secrets Engine to generate ephemeral, short-lived, dynamic STS tokens per pipeline run that automatically expire, eliminating the risk of long-lived credential theft.
PreRequisites
Section titled “PreRequisites”- JDK
- Git
- Github
- GitHub CLI
- Jenkins
- Sonarqube
- Jfrog Artifactory
- Docker
- Trivy
- AWS account
- AWS CLI
- Docker Hub account
- Terraform
- EKS Cluster
- kubectl
- ArgoCD
- Helm
- Prometheus & Grafana
- Hashicorp Vault
- Slack
Server Configuration ( I used )
Section titled “Server Configuration ( I used )”-
2 t2.medium ( ubuntu) EC2 Instances – 1. one for sonarqube and Hashicorp vault server & 2. another for Jfrog Artifactory
-
1 t2.large (ubuntu ) EC2 Instance - For Jenkins, Docker, Trivy, AWS CLI, Github CLI, Terraform
-
EKS Cluster with t3.medium nodes
Want to create this Project on your own then Follow these project steps
Section titled “Want to create this Project on your own then Follow these project steps”Step: 1 Installation Part
Section titled “Step: 1 Installation Part”Stage-01: Install JDK and Create a Java Springboot application
Section titled “Stage-01: Install JDK and Create a Java Springboot application”Push all the web application code files into GitHub
Stage-02: Install Jenkins, Docker, Trivy, AWS CLI, Github CLI, Terraform ( t2.large node1 -Jenkins-server)
Section titled “Stage-02: Install Jenkins, Docker, Trivy, AWS CLI, Github CLI, Terraform ( t2.large node1 -Jenkins-server)”Jenkins Installation Prerequisites https://www.jenkins.io/doc/book/installing/linux/
Section titled “Jenkins Installation Prerequisites https://www.jenkins.io/doc/book/installing/linux/”- Installation guide is available here ./Jenkins_installation.md
- After installation, install the suggested plugins
- Open Jenkins Dashboard and install required plugins – SonarQube Scanner, Quality gates, Artifactory, Hashicorp Vault, Slack, Open Blue Ocean
- go to manage Jenkins > manage plugins > search for plugins > Download now and install after restart
Docker Installation
Section titled “Docker Installation”- Install docker using this command
sudo apt install docker.io- Add the current user and Jenkins user into the docker group
sudo usermod -aG docker $USERsudo usermod -aG docker jenkinsTrivy Installation
Section titled “Trivy Installation”- Install Trivy using these commands
sudo apt-get install wget apt-transport-https gnupg lsb-releasewget -qO - https://aquasecurity.github.io/trivy-repo/deb/public.key | sudo apt-key add -echo deb https://aquasecurity.github.io/trivy-repo/deb $(lsb_release -sc) main | sudo tee -a /etc/apt/sources.list.d/trivy.listsudo apt-get updatesudo apt-get install trivyAWS CLI installation
Section titled “AWS CLI installation”- install aws cli using these commands
sudo apt install unzipcurl "https://awscli.amazonaws.com/awscli-exe-linux-x86_64.zip" -o "awscliv2.zip"unzip awscliv2.zipsudo ./aws/installInstall GitHub CLI
Section titled “Install GitHub CLI”- install GitHub cli using these commands
#### Check if curl is installed, and install it if nottype -p curl >/dev/null || { sudo apt update && sudo apt install curl -y; }
#### Install GitHub CLIcurl -fsSL https://cli.github.com/packages/githubcli-archive-keyring.gpg | sudo dd of=/usr/share/keyrings/githubcli-archive-keyring.gpg \&& sudo chmod go+r /usr/share/keyrings/githubcli-archive-keyring.gpg \&& echo "deb [arch=$(dpkg --print-architecture) signed-by=/usr/share/keyrings/githubcli-archive-keyring.gpg] https://cli.github.com/packages stable main" | sudo tee /etc/apt/sources.list.d/github-cli.list > /dev/null \&& sudo apt update \&& sudo apt install gh -y
Install Terraform
Section titled “Install Terraform”- install terraform using these commands
sudo apt-get update && sudo apt-get install -y gnupg software-properties-commonwget -O- https://apt.releases.hashicorp.com/gpg | \gpg --dearmor | \sudo tee /usr/share/keyrings/hashicorp-archive-keyring.gpggpg --no-default-keyring \ --keyring /usr/share/keyrings/hashicorp-archive-keyring.gpg \ --fingerprintecho "deb [signed-by=/usr/share/keyrings/hashicorp-archive-keyring.gpg] \https://apt.releases.hashicorp.com $(lsb_release -cs) main" | \sudo tee /etc/apt/sources.list.d/hashicorp.listsudo apt updatesudo apt-get install terraformStage-03 : Install SonarQube and Hashicorp Vault ( t2.medium node2 - SonarQube Server )
Section titled “Stage-03 : Install SonarQube and Hashicorp Vault ( t2.medium node2 - SonarQube Server )”SonarQube installation
Section titled “SonarQube installation”- install docker on the sonarqube server
sudo apt updatesudo apt install docker.io- create a docker container to install SonarQube
sudo docker run -d -p 9000:9000 --name sonarqube sonarqubeInstall the Hashicorp Vault server
Section titled “Install the Hashicorp Vault server”HashiCorp Vault is a secret-management tool specifically designed to control access to sensitive credentials in a low-trust environment.
- Installation vault using these commands
sudo curl -fsSL https://apt.releases.hashicorp.com/gpg | sudo apt-key add -sudo apt-add-repository "deb [arch=amd64] https://apt.releases.hashicorp.com $(lsb_release -cs) main"sudo apt updatesudo apt install vault -yStage-04: Install Jfrog Artifactory ( t2.medium node3 - Jforg-artifactory server)
Section titled “Stage-04: Install Jfrog Artifactory ( t2.medium node3 - Jforg-artifactory server)”- install the docker
sudo apt updatesudo apt install docker.io- Install Jfrog Artifactory
sudo docker pull docker.bintray.io/jfrog/artifactory-oss:latestsudo mkdir -p /jfrog/artifactorysudo chown -R 1030 /jfrog/sudo docker run --name artifactory -d -p 8081:8081 -p 8082:8082 \ -v /jfrog/artifactory:/var/opt/jfrog/artifactory \ docker.bintray.io/jfrog/artifactory-oss:latestStage-05 : Install Slack ( on your local system or login in google chrome)
Section titled “Stage-05 : Install Slack ( on your local system or login in google chrome)”Slack is a workplace communication tool, “a single place for messaging, tools and files.” Install Slack from the official website of Slack https://slack.com/intl/en-in/downloads/linux
Stage-06: EKS Cluster Creation using Terraform
Section titled “Stage-06: EKS Cluster Creation using Terraform”To create EKS Cluster using Terraform, I have put the Terraform code here - GitHub source link
Suggestion – create eks cluster after successful configuration of jenkins server. When jenkins is able to create pull request in the manifest repo.
Note: I have installed the terraform in the jenkins server and configured aws cli to create eks cluster. But you can use your local system to create eks cluster . for this, you have to install Terraform and aws cli on your local system.
Run this command after eks cluster creation to update or configure .kube/config file
aws eks --region your-region-name update-kubeconfig --name cluster-nameStage-07: Install ArgoCD in EKS
Section titled “Stage-07: Install ArgoCD in EKS”I am assuming that you have already Kubernetes cluster running
- use these commands to install argocd
kubectl create namespace argocdkubectl apply -n argocd -f https://raw.githubusercontent.com/argoproj/argo-cd/stable/manifests/install.yaml- edit the argocd-server service to NodePort to access argocd ui
kubectl -n argocd edit svc argocd-serverStage-08: Install helm ( on the system from where you are creating eks cluster)
Section titled “Stage-08: Install helm ( on the system from where you are creating eks cluster)”- use these commands to install the helm
curl https://baltocdn.com/helm/signing.asc | gpg --dearmor | sudo tee /usr/share/keyrings/helm.gpg > /dev/nullsudo apt-get install apt-transport-https --yesecho "deb [arch=$(dpkg --print-architecture) signed-by=/usr/share/keyrings/helm.gpg] https://baltocdn.com/helm/stable/debian/ all main" | sudo tee /etc/apt/sources.list.d/helm-stable-debian.listsudo apt-get updatesudo apt-get install helmStage-09: Install Prometheus and Grafana ( from where you have installed helm)
Section titled “Stage-09: Install Prometheus and Grafana ( from where you have installed helm)”- use helm to install Prometheus and grafana
helm repo add stable https://charts.helm.sh/stablehelm repo add prometheus-community https://prometheus-community.github.io/helm-chartshelm search repo prometheus-communitykubectl create namespace prometheushelm install stable prometheus-community/kube-prometheus-stack -n prometheuskubectl get pods -n prometheuskubectl get svc -n prometheus#in order to make Prometheus and grafana available outside the cluster, use LoadBalancer or NodePort instead of ClusterIP.#Edit Prometheus Servicekubectl edit svc stable-kube-prometheus-sta-prometheus -n prometheus#Edit Grafana Servicekubectl edit svc stable-grafana -n prometheuskubectl get svc -n prometheus
#Access Grafana UI in the browser using load balancer or nodeport
UserName: adminPassword: prom-operator
Done with Installation, Now will we Configure each the tools
Step: 2 Configure Individual tool
Section titled “Step: 2 Configure Individual tool”Stage-01 : Jenkins Configuration
Section titled “Stage-01 : Jenkins Configuration”-
go to Manage Jenkins > configure tools > go to maven> give some name and click on install automatically
-
go to Manage Jenkins > configure tools > go to sonarqube scanner > give some name and click on install automatically
Stage-02: Hashicorp Vault Configuration
Section titled “Stage-02: Hashicorp Vault Configuration”I am assuming that your Vault server is installed and running
- open the
/etc/vault.d/vault.hclfile with vi or nano - replace all the content of this file with this
storage "raft" {  path    = "/opt/vault/data"  node_id = "raft_node_1"}
listener "tcp" {  address     = "0.0.0.0:8200"  tls_disable = 1}
api_addr = "http://127.0.0.1:8200"cluster_addr = "https://127.0.0.1:8201"ui = truesudo systemctl stop vaultsudo systemctl start vaultCommands to run to configure Vault and create AppRole
Section titled “Commands to run to configure Vault and create AppRole”export VAULT_ADDR='http://127.0.0.1:8200'vault operator initcopy the unseal tokens and initial root token, save it somewhere for later use
vault operator unsealPaste the first unseal token here
vault operator unsealPaste the second unseal token here
vault operator unsealPaste the third unseal token here
vault login <Initial_Root_Token><Initial_Root_Token>is found in the output ofvault operator init
vault auth enable approlevault write auth/approle/role/jenkins-role token_num_uses=0 secret_id_num_uses=0 policies="jenkins"This app role will use for jenkins integration
vault read auth/approle/role/jenkins-role/role-idCopy the role_id and token, and store somewhere
vault write -f auth/approle/role/jenkins-role/secret-idCopy the secret-id and token, store them somewhere
Stage-03: SonarQube Server Configuration
Section titled “Stage-03: SonarQube Server Configuration”- Access the sonarqube ui using the public IP of the server and port 9000
- default username-password
adminandadmin
Project setup
Section titled “Project setup”-
chose use global setting
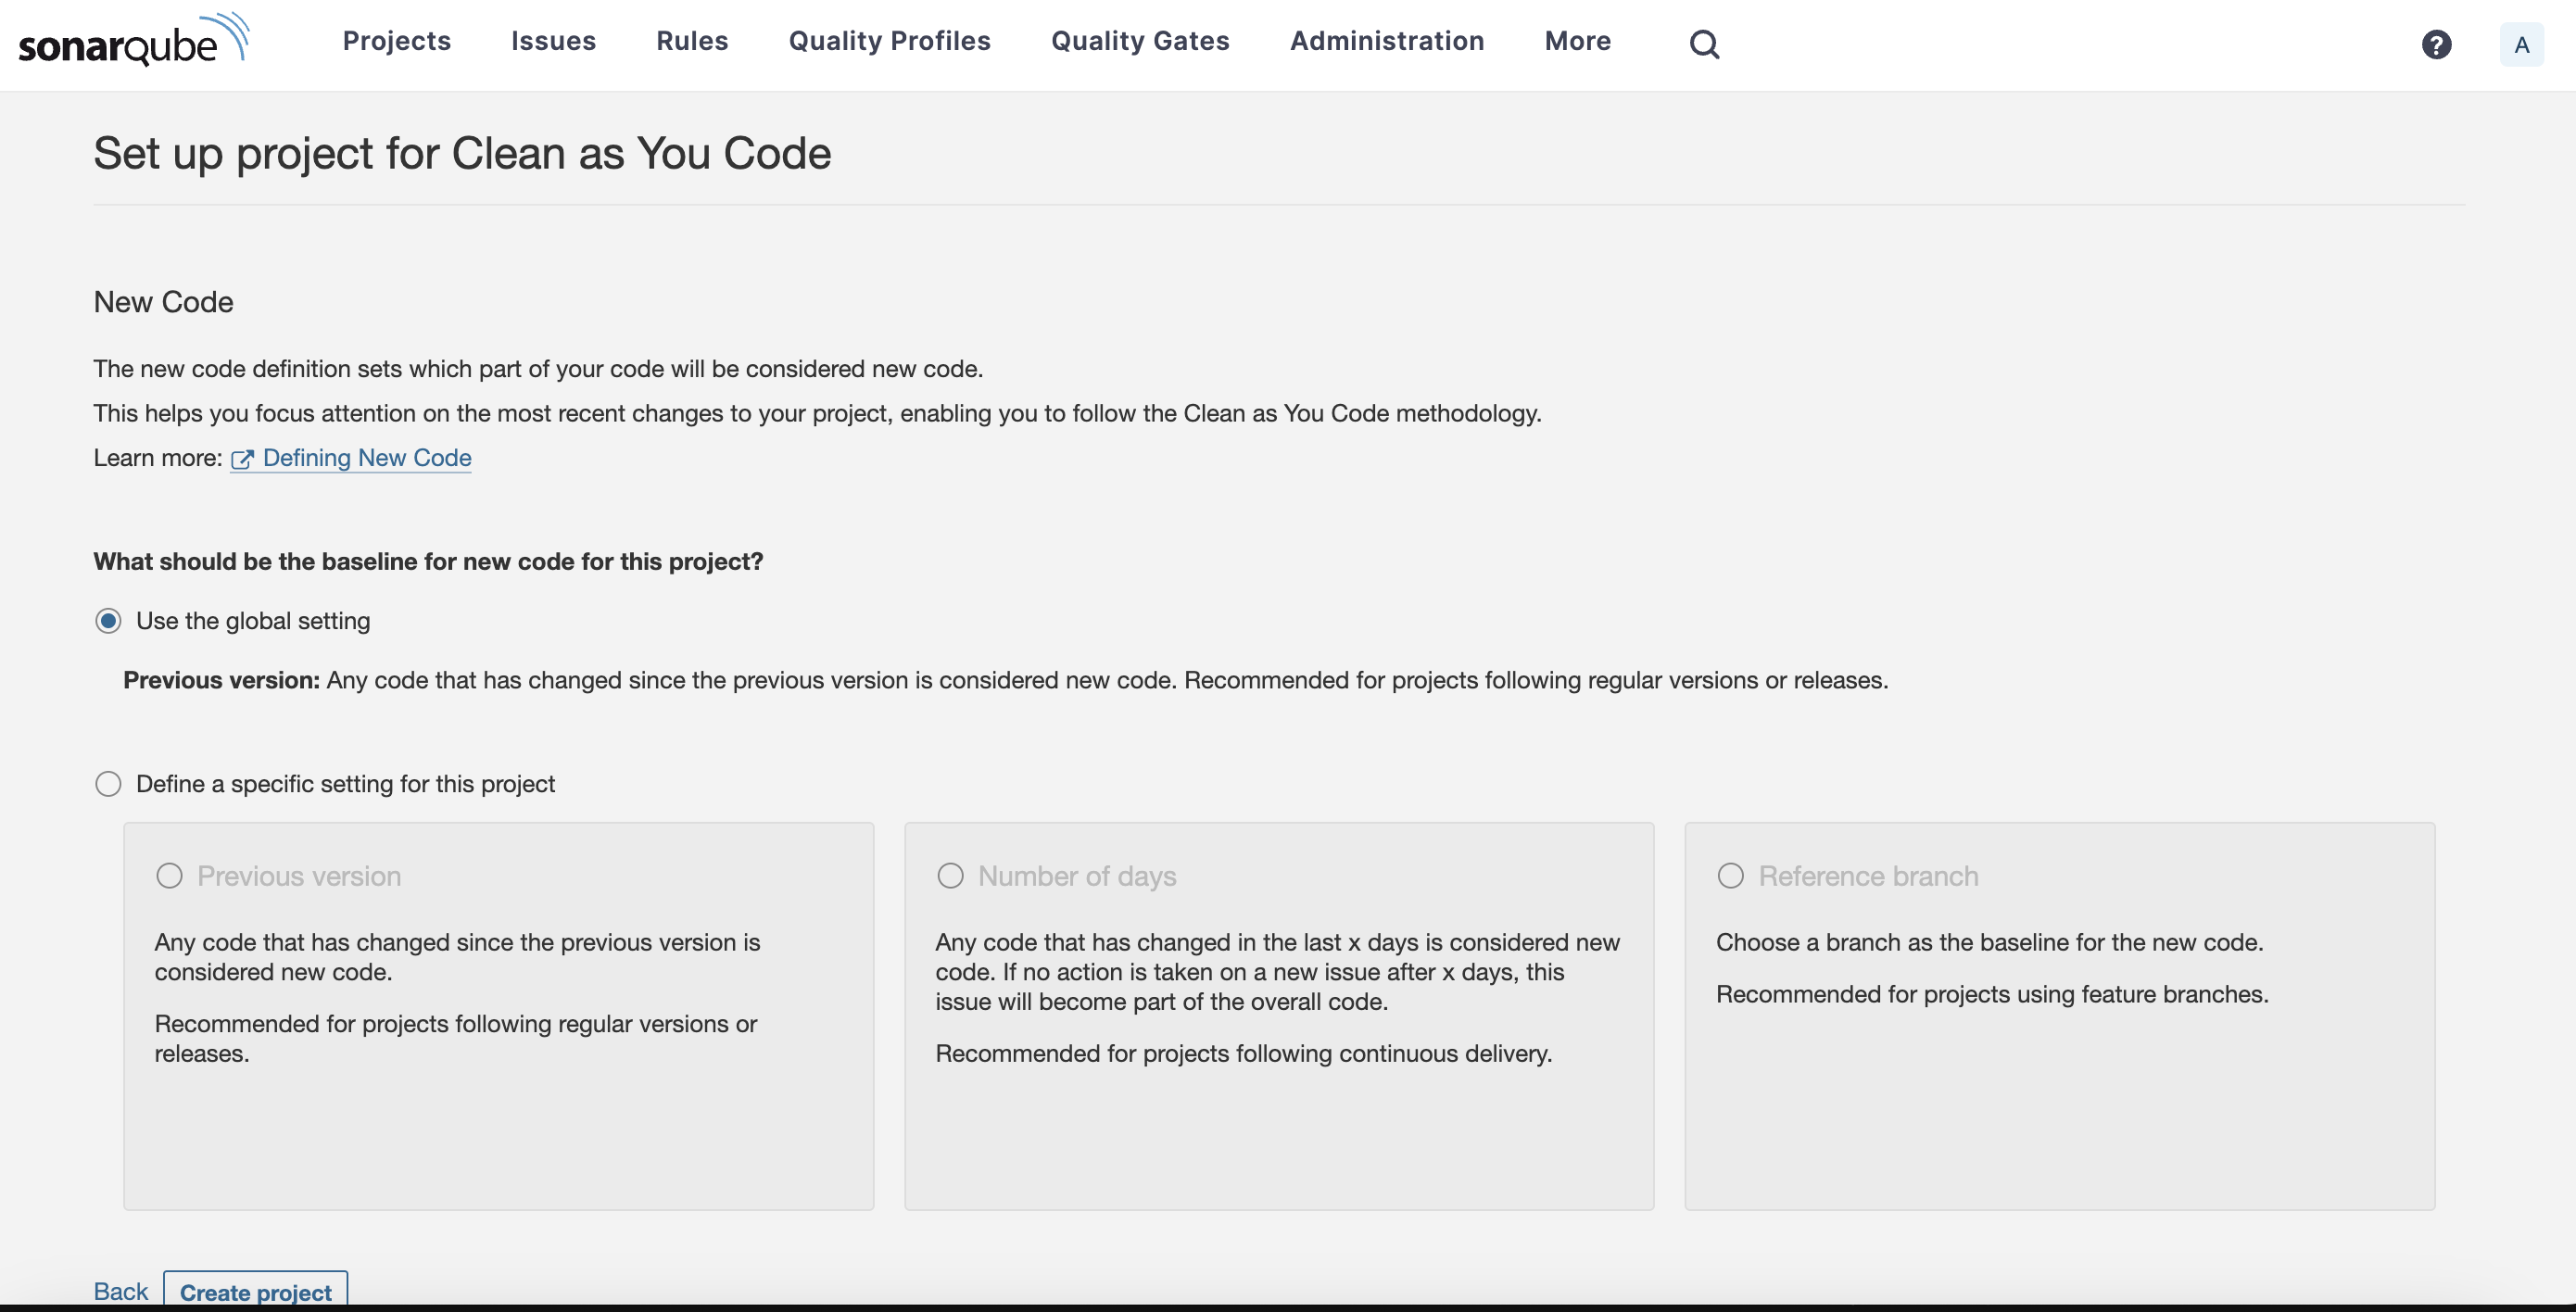
-
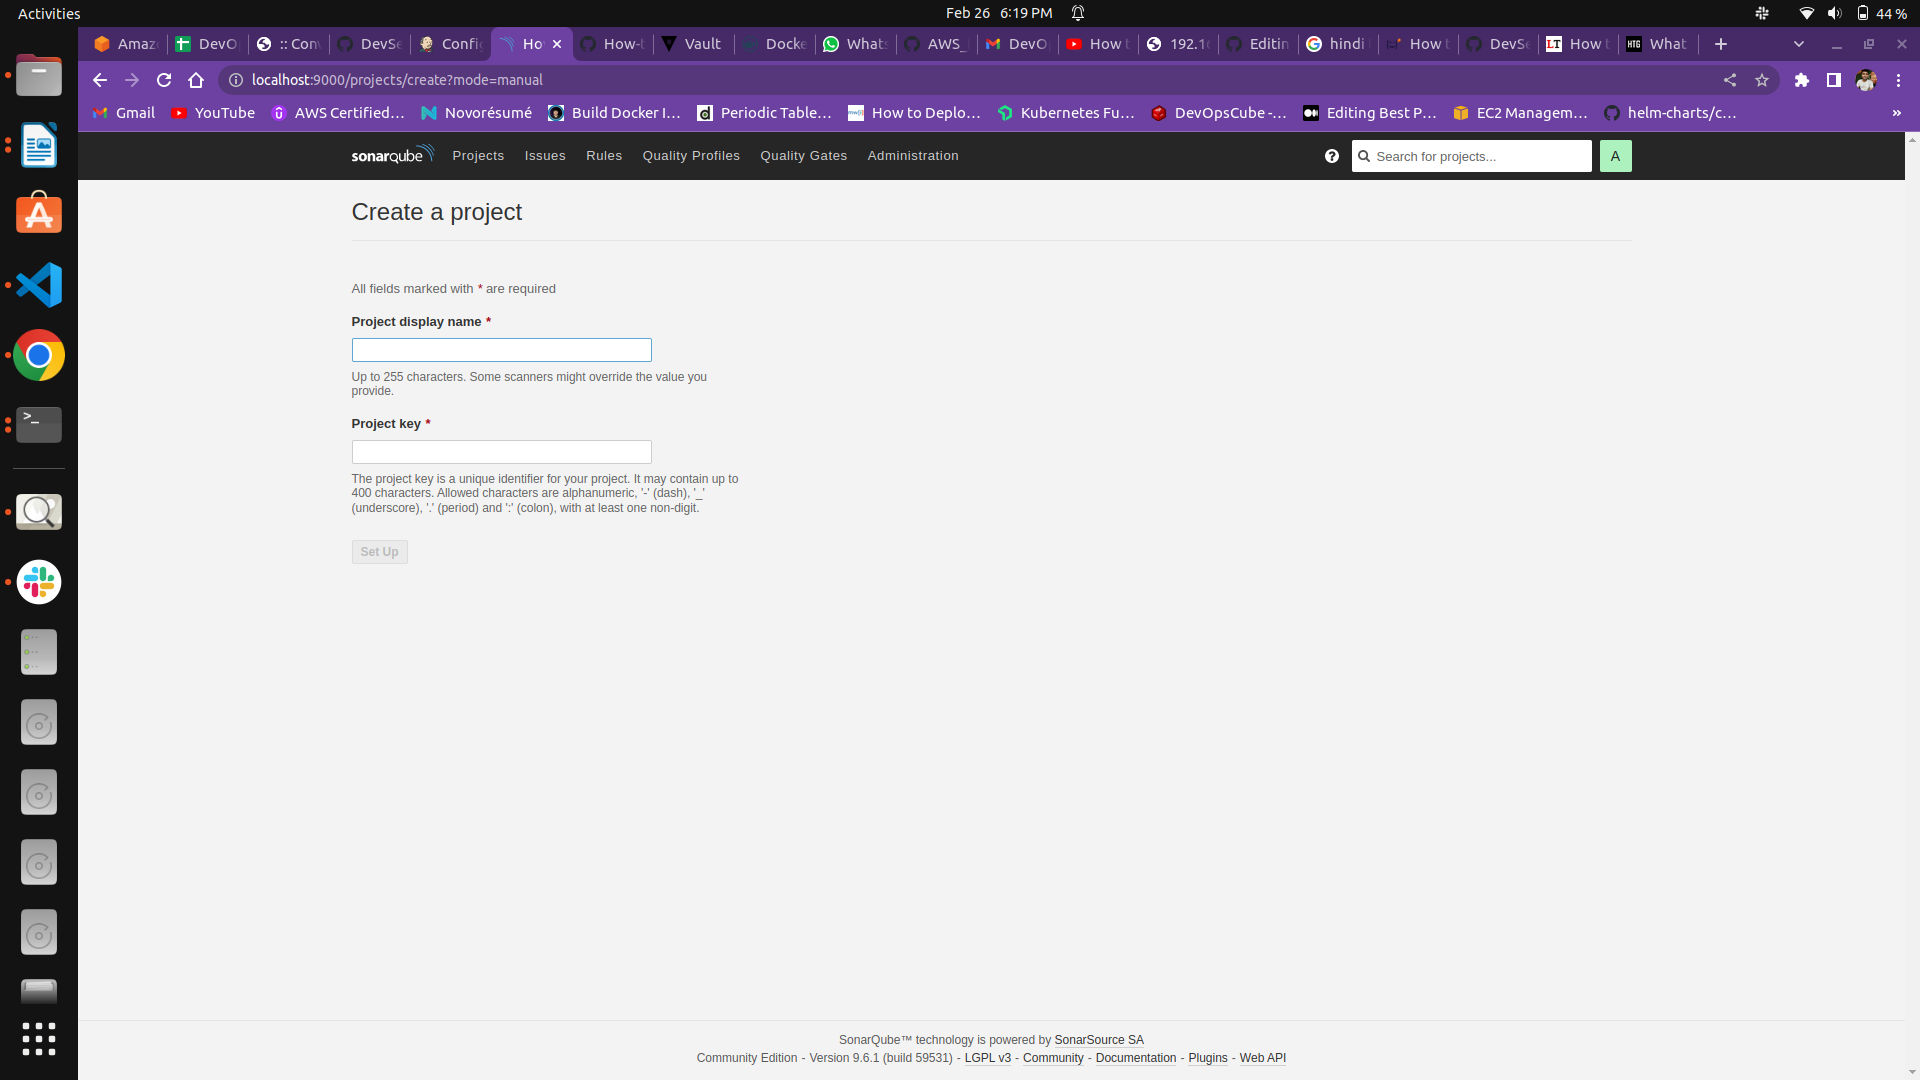
create a project manually, give some name to project, project key
-
click on setup
-
click on other ci
-
give some name to the token and click on generate, save it for a later user
-
click on global
-
select the project type, in this case, I used Maven
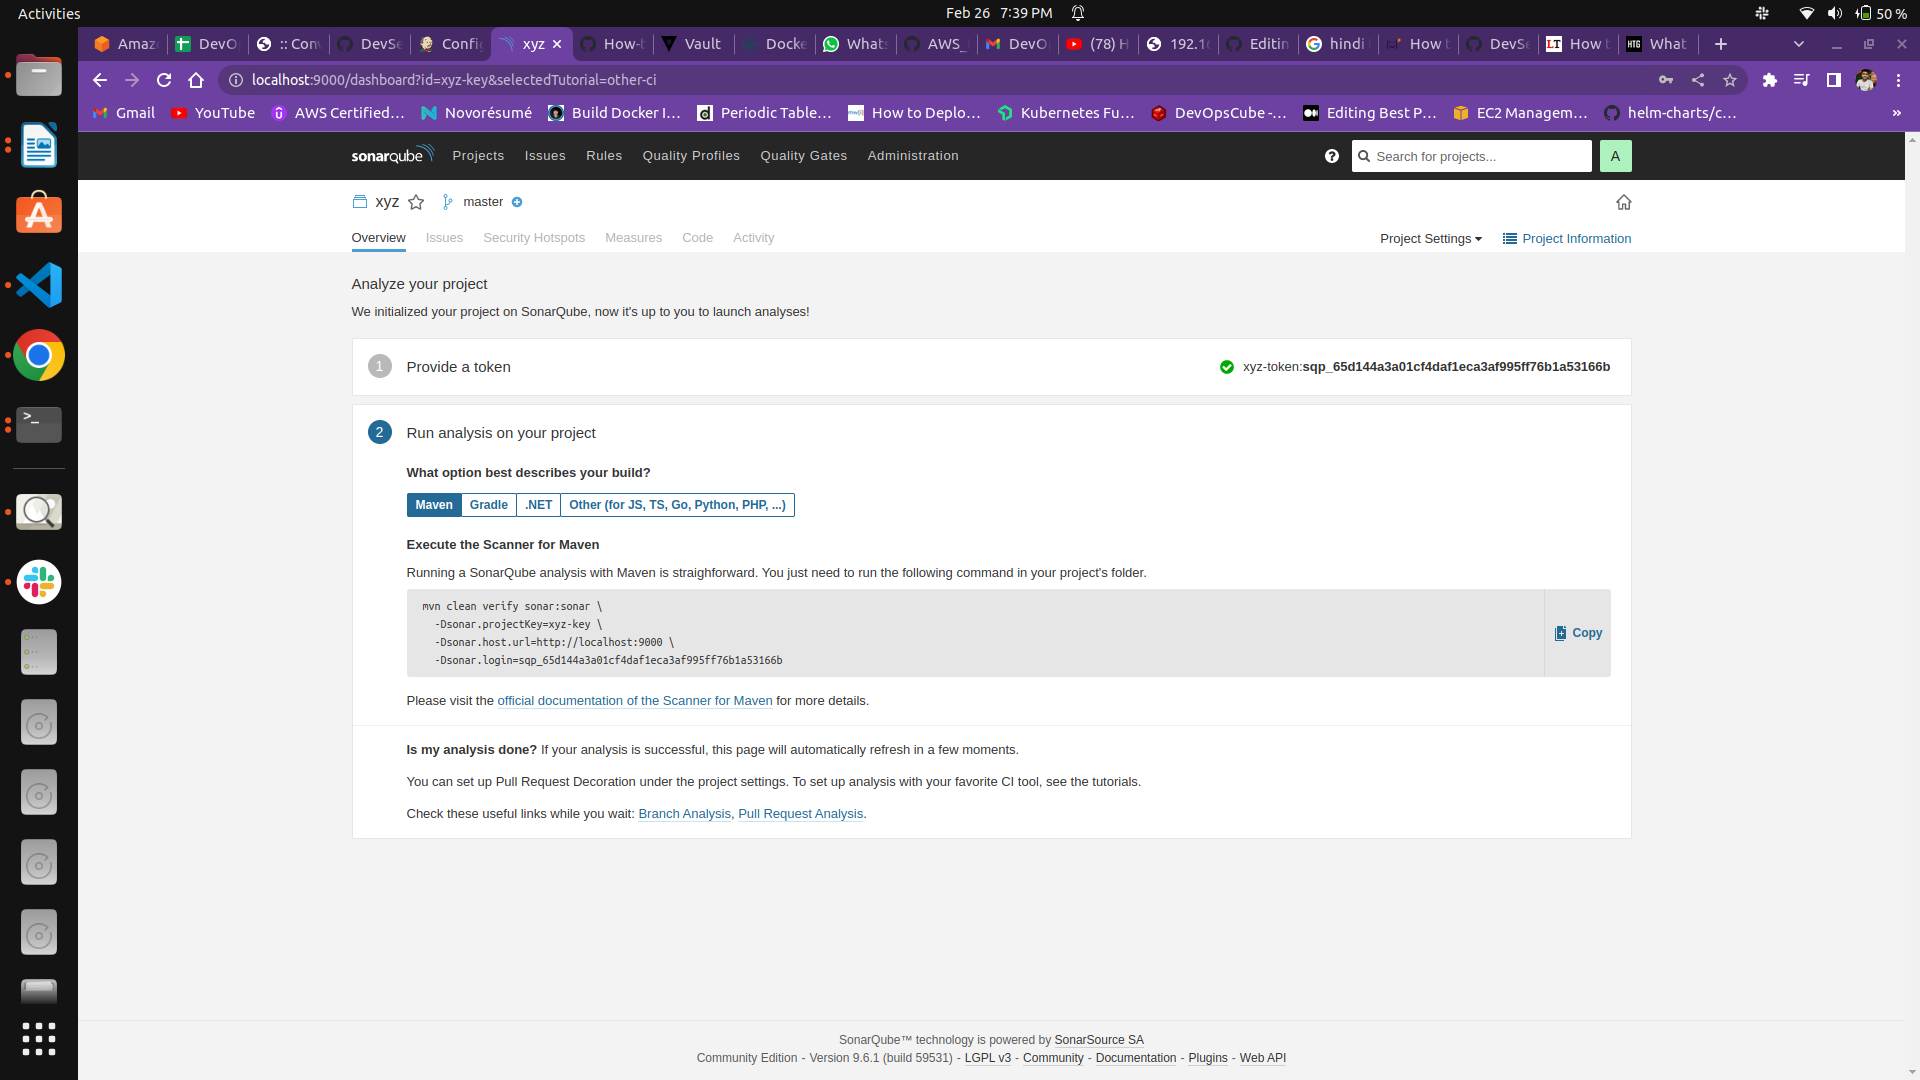
- copy the whole command and save it somewhere
Create Quality Gate
Section titled “Create Quality Gate”- Click on Quality Gates
- Create a new Quality Gate according to your conditions
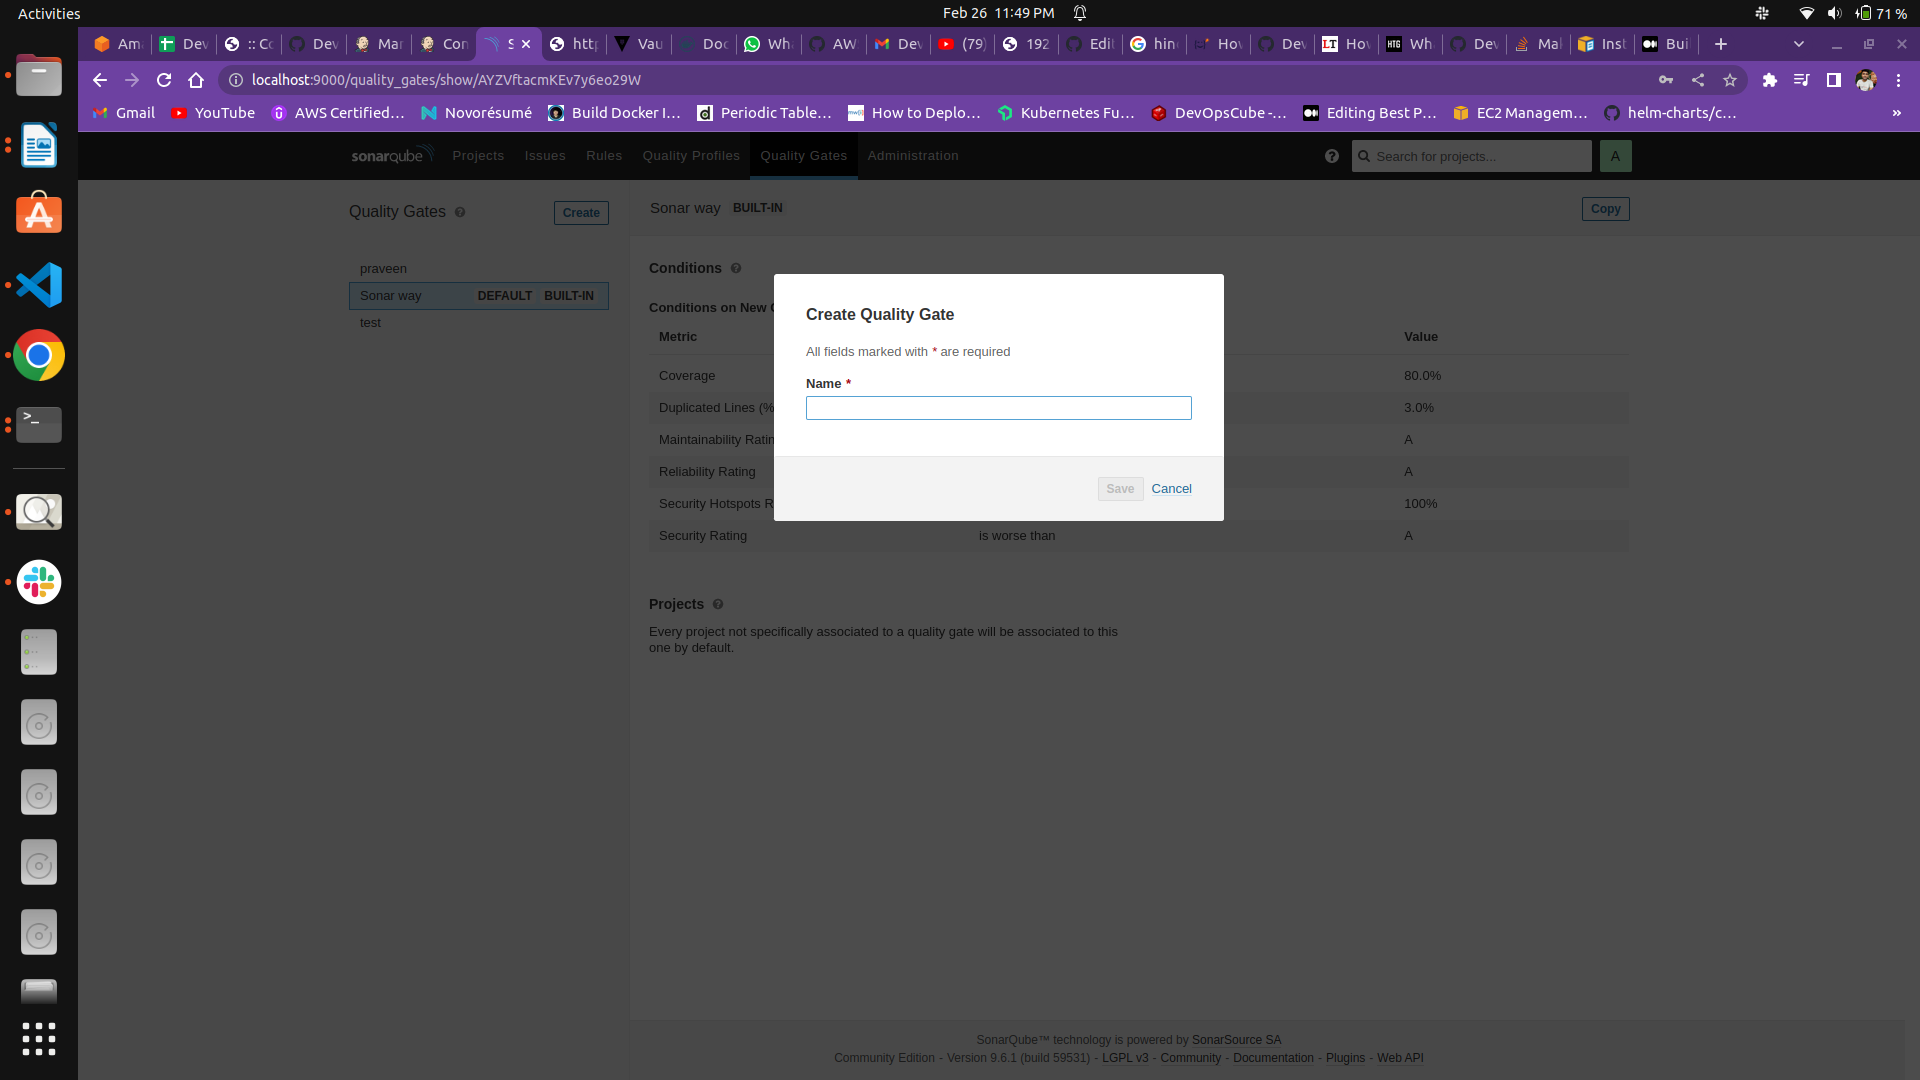
- Click on Projects > click on all > select your project
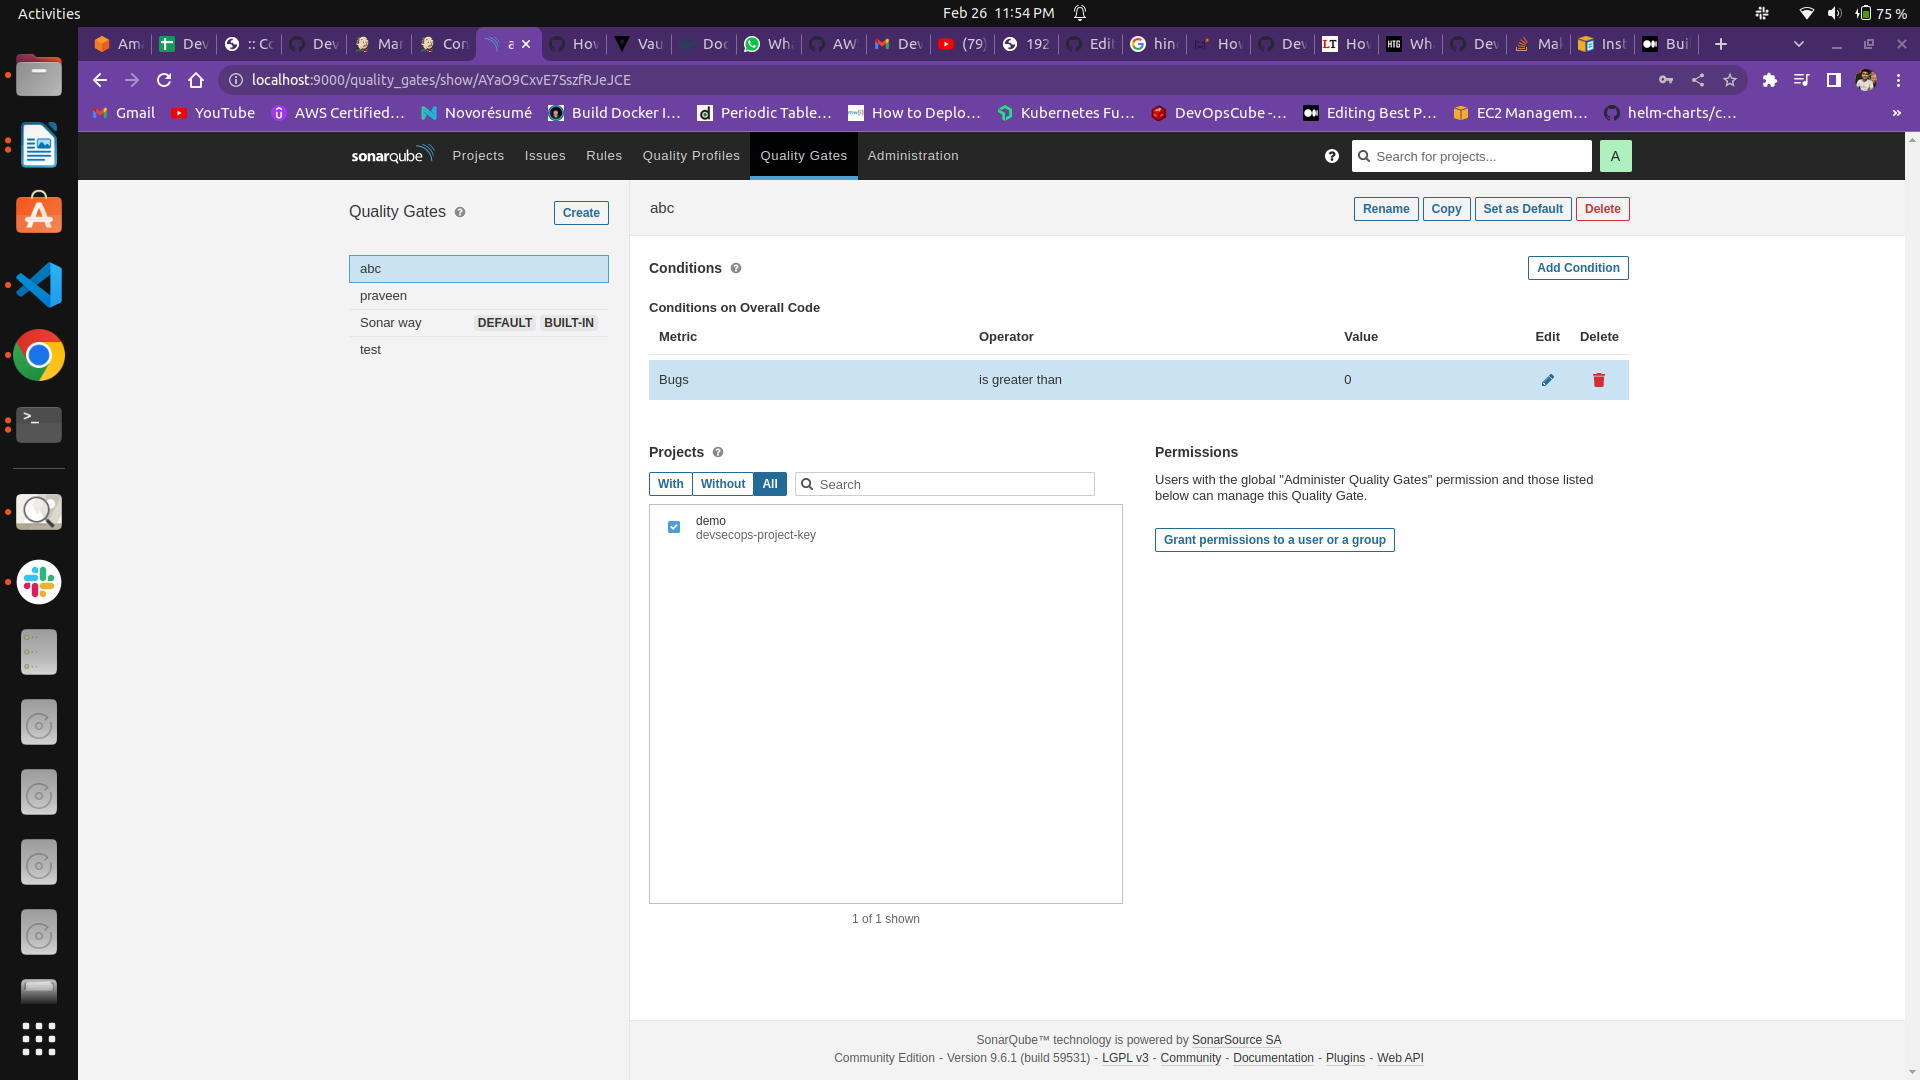 4. Set as default
Create webhook
Section titled “Create webhook”- Click on Administration
- Click on Configuration > click on webhooks
- Create a webhook > Give some name
- for url use
http://jenkins-server-url-with-port/sonarqube-webhook/
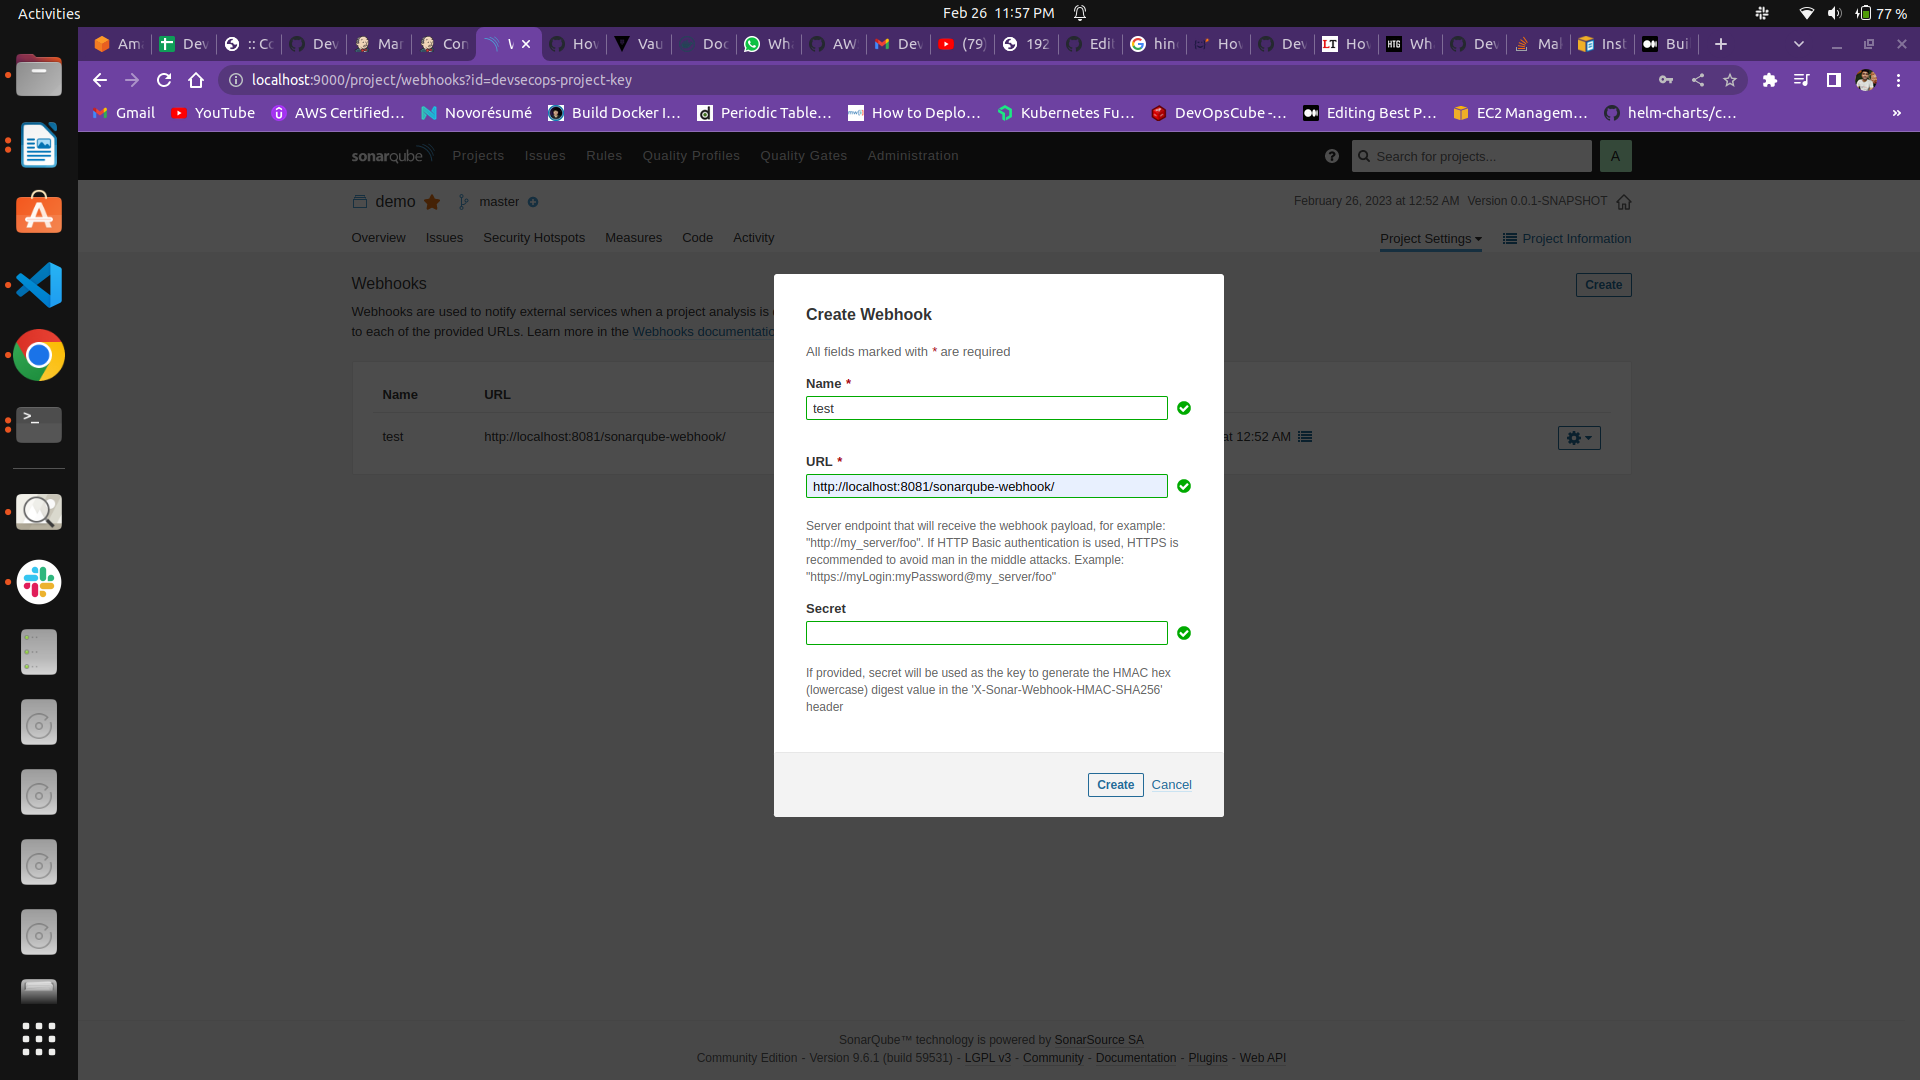
- In secret leave the blank
- Click on create
Note: if this webhook does not work fine, then recreate the webhook after integrating the soanrqube with jenkins
Stage-04: Artifactory Configuration
Section titled “Stage-04: Artifactory Configuration”- access the UI with public IP and port 8081
- use username-password as
adminandpassword - update the password
- create a Maven repo
- now go to Administration > User management > Create a new user
- now go to Repositories > create > locally > give some name like
my-local-repo
Stage-05: S3 Bucket creation to store Trivy report
Section titled “Stage-05: S3 Bucket creation to store Trivy report”- login into aws account
- search for S3
- create a bucket with a unique name
Stage-06: DockerHub account creation
Section titled “Stage-06: DockerHub account creation”If you already have a dockerhub account then no need to create another
-
go to dockerhub official website
-
click on sign up
-
fill in the details and sing up
-
login into dockerhub
Note: we can create token from dockerhub to integrate jenkins but in this case, I am using docker username and password.
Stage-07: Slack Configuration for jenkins
Section titled “Stage-07: Slack Configuration for jenkins”- Go to this site https://slack.com/intl/en-in
- sign up with Google
- create a workspace
- just give a name
- you can skip add team member
- give some name to team working ( channel name like - cicd-pipeline)
- now go to this site https://slack-t8s2905.slack.com/intl/en-in/apps
- login into your workspace (if need)
- now click on Get Essential Apps
- search Jenkins in search bar > click on it
- Click on Add to Slack
- select channel name
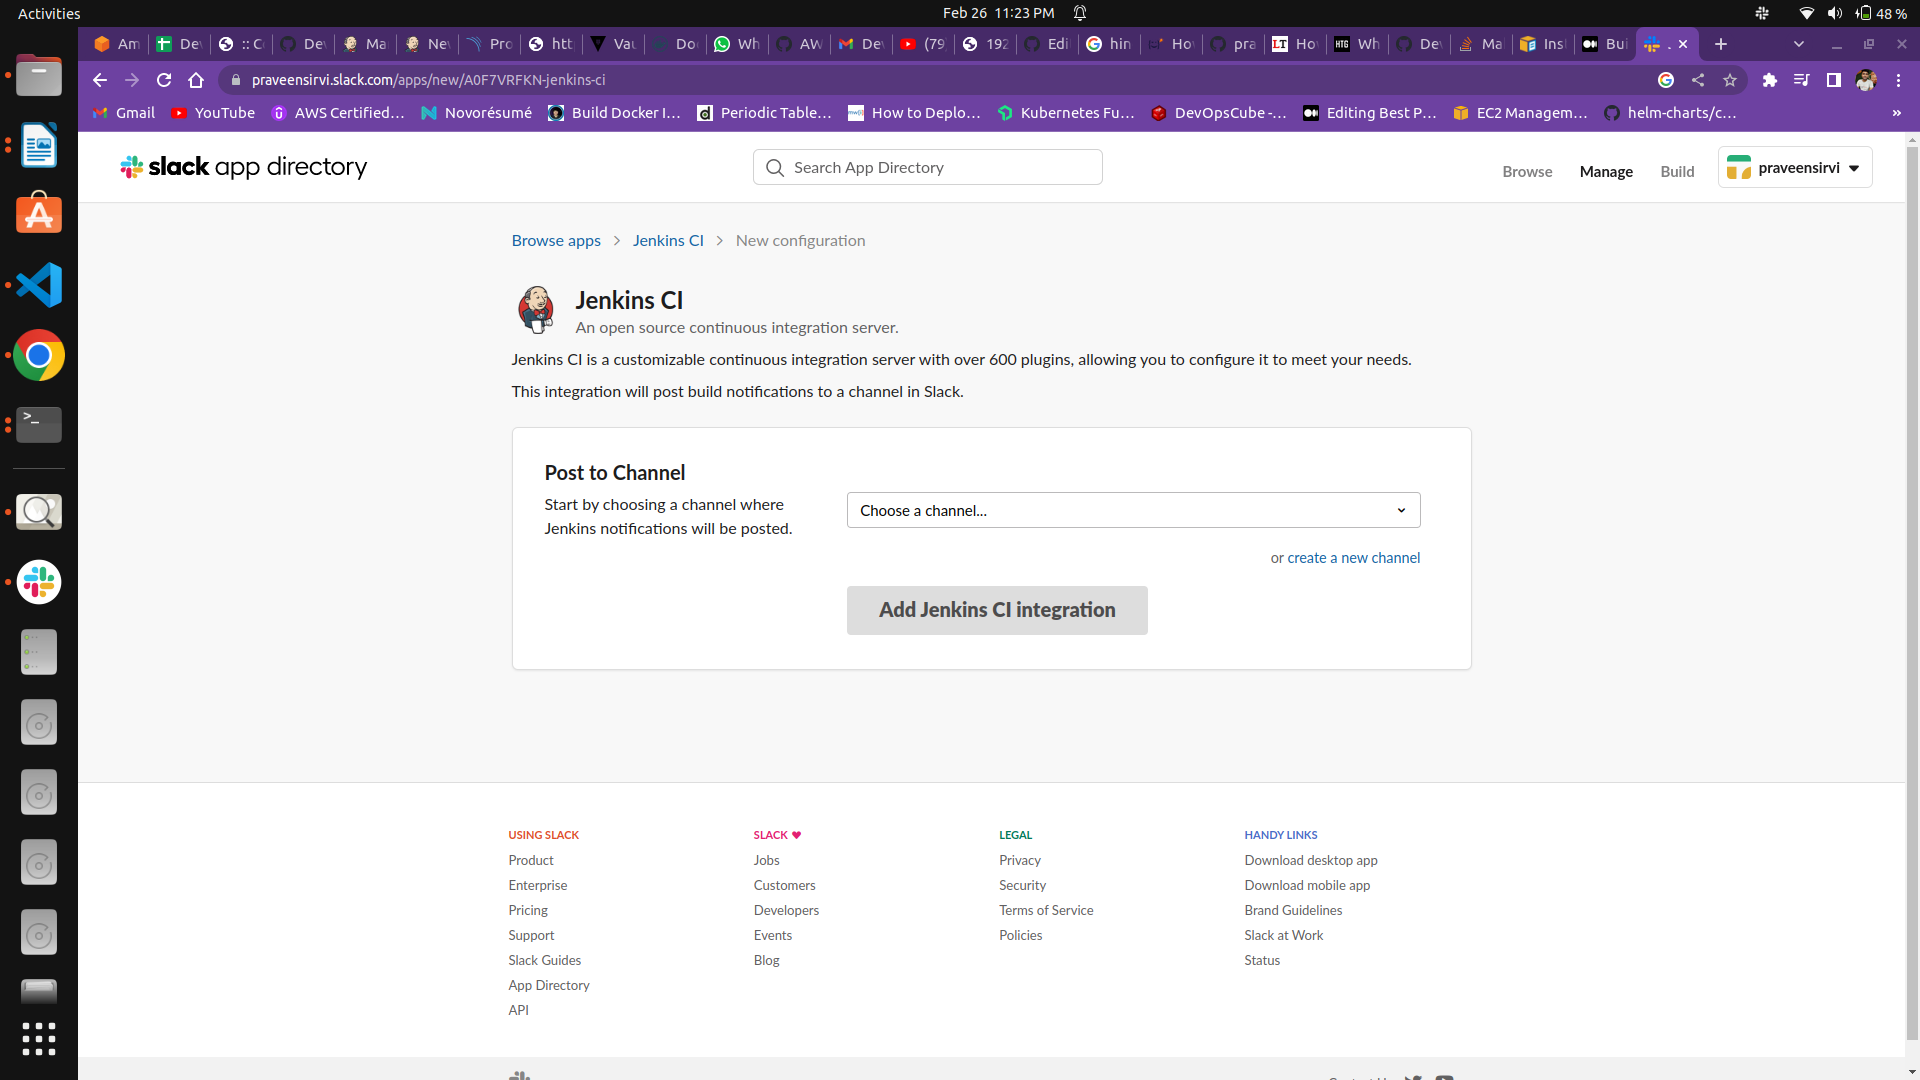
- Click on Add Jenkins CI Integration
- Go down to step 3 and copy Integration Token Credential ID and save it somewhere
- Click on Save settings
Stage-08: Slack Configuration for ArgoCD
Section titled “Stage-08: Slack Configuration for ArgoCD”- Go to this site https://api.slack.com/apps
- click on Create New App
- select From scratch
- give some app name
- pick your workspace
- click on Create App
- go to OAuth & Permission
- go to Scope > Bot Token Scope
- search in the search bar and select
chat:write,chat:write.customize - now to up to OAuth Token for Your Workspace
- click on Install to workspace
- allow your app to access your workspace
- now copy Bot user OAuth Token and save it somewhere
- now open slack , you will find your app in Apps
- now create a channel - click on channels > create channel > give some name to channel > create
- now in message bar type
@your-app-nameand click on send icon > click on add to channel
Done with Configuration of all tools, Now will we store the credentials into Vault server.
Step: 3 Store the Credentials in the Vault server
Section titled “Step: 3 Store the Credentials in the Vault server”Run all these commands into the vault server
- enable secrets path
vault secrets enable -path=secrets kv- write the secret into secret path
vault write secrets/creds/docker username=abcd password=xyzLikewise, we can store all the credentials in the vault server. I have stored only the docker credential. But you can store all your credential like this.
- create a jenkins policy file with vi or nano
jenkins-policy.hcl
path "secrets/creds/*" { capabilities = ["read"]}The policy is created with * means the vault server can read credentials from every path. No need to create policies for each path like secrets/creds/docker , secrets/creds/slack etc…
- run this command to create a policy
vault policy write jenkins jenkins-policy.hclDone with Configuration of all tools, Now will we integrate tools with jenkins
Step: 4 Integrate all the tools into jenkins for CI
Section titled “Step: 4 Integrate all the tools into jenkins for CI”Stage-01: Hashicorp Vault server integration with Jenkins
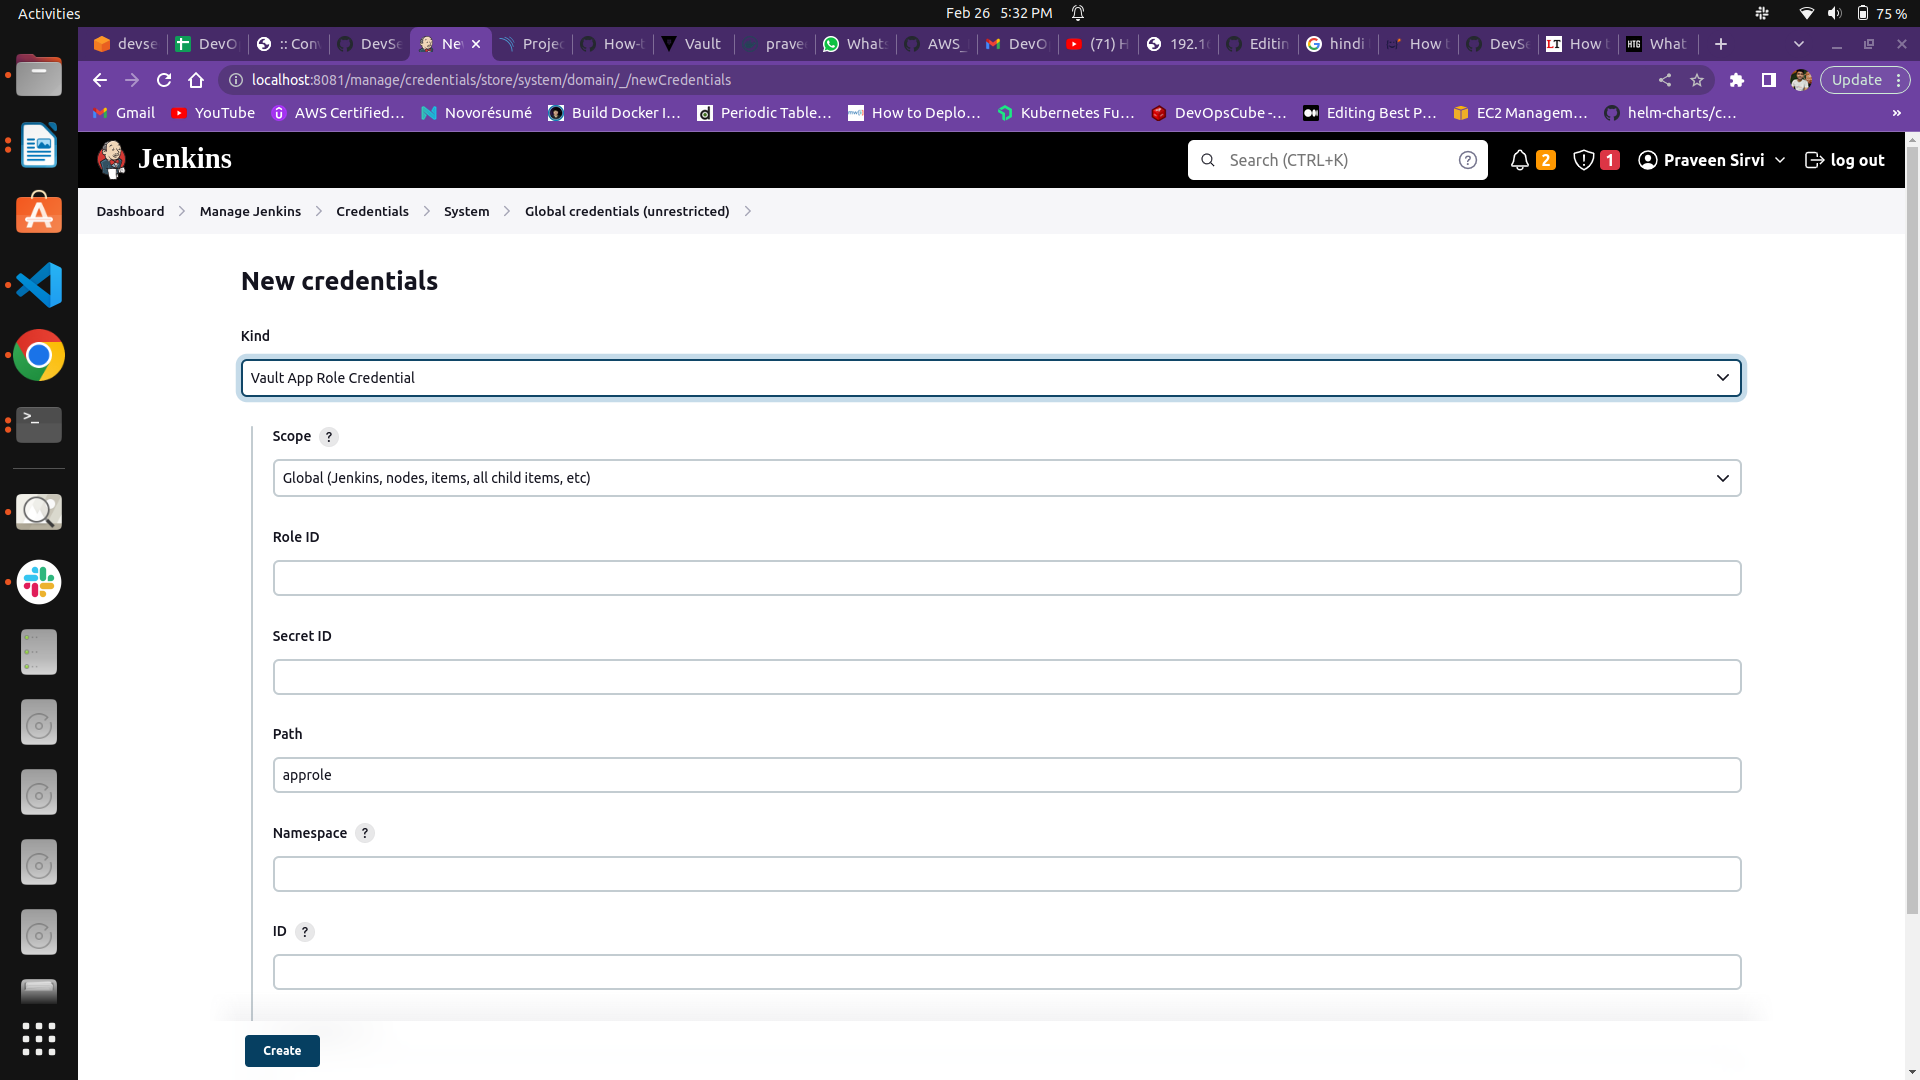
Section titled “Stage-01: Hashicorp Vault server integration with Jenkins”- go to Jenkins> Manage Jenkins >Manage Credentials > system > Add credentials > Vault App Role Credentials > Paste role-id and secret-id token (we create in Vault - approle) and save and apply.
- now to Manage Jenkins > configure system/system> search for vault plugin
- give the URL of the vault server
- attach the credentials we created
- click on Advanced
- select k/v engine as 1
- click on skip ssl verification
- Apply and Save
Stage-02: SonarQube server integration with Jenkins
Section titled “Stage-02: SonarQube server integration with Jenkins”- go to Manage Jenkins>Manage Credentials > system > Add credentials > secret text file > paste the token we create in sonarqube and save and apply.
- now to Manage Jenkins > configure system/system> search for SonarQube Server
- enable the environment variables
- write the name of Sonaqube server
- paste the url of SonarQube server
- select the credential
- Apply and Save
Stage-03: Jfrog Artifactory integration with Jenkins
Section titled “Stage-03: Jfrog Artifactory integration with Jenkins”-
go to Manage Jenkins>Manage Credentials > system > Add credentials > username and password > write the username and password we created in Jfrog artifacotry and save and apply.
-
now to Manage Jenkins > configure system/system> search for Jfrog
-
give instance id as artifactory name
-
Jfrog Platform url - artifactory url like - http://localhost:8082
-
click on Advanced
-
JFrog Artifactory URL - http://localhost:8082/artifactory
-
JFrog Distribution URL - http://localhost:8082/distribution
-
Default Deployer Credentials – give username and password of artifactory (not admin user)
-
Apply and save
Stage-04: AWS S3 integration with Jenkins
Section titled “Stage-04: AWS S3 integration with Jenkins”- for S3 integration we will configure aws cli in the pipeline itself
- create credentials for aws cli, use both as the secret text
Stage-05: DockerHub integration with Jenkins
Section titled “Stage-05: DockerHub integration with Jenkins”- go to Manage jenkins >Manage Credentials > system > Add credentials > vault Username-Password Credential
- namespace – leave blank
- Prefix Path – leave blank
- Path – secrets/creds/docker
- Username Key- username
- Password key – password
- k/v engine – 1
- id – give some id like docker-cred
- Description - give some description
- click on Test Vault Secrets retrieval > should give output as secrets retrieved successfully otherwise reconfigure the vault server in jenkins
- Apply and Save
Stage-05: Slack integration with Jenkins
Section titled “Stage-05: Slack integration with Jenkins”-
Go to Manage Jenkins>Manage Credentials > system > Add credentials > secret text file > give some name to credentials, paste the token we create in the Slack app and save and apply.
-
now to Manage Jenkins > configure system/system> search for Slack
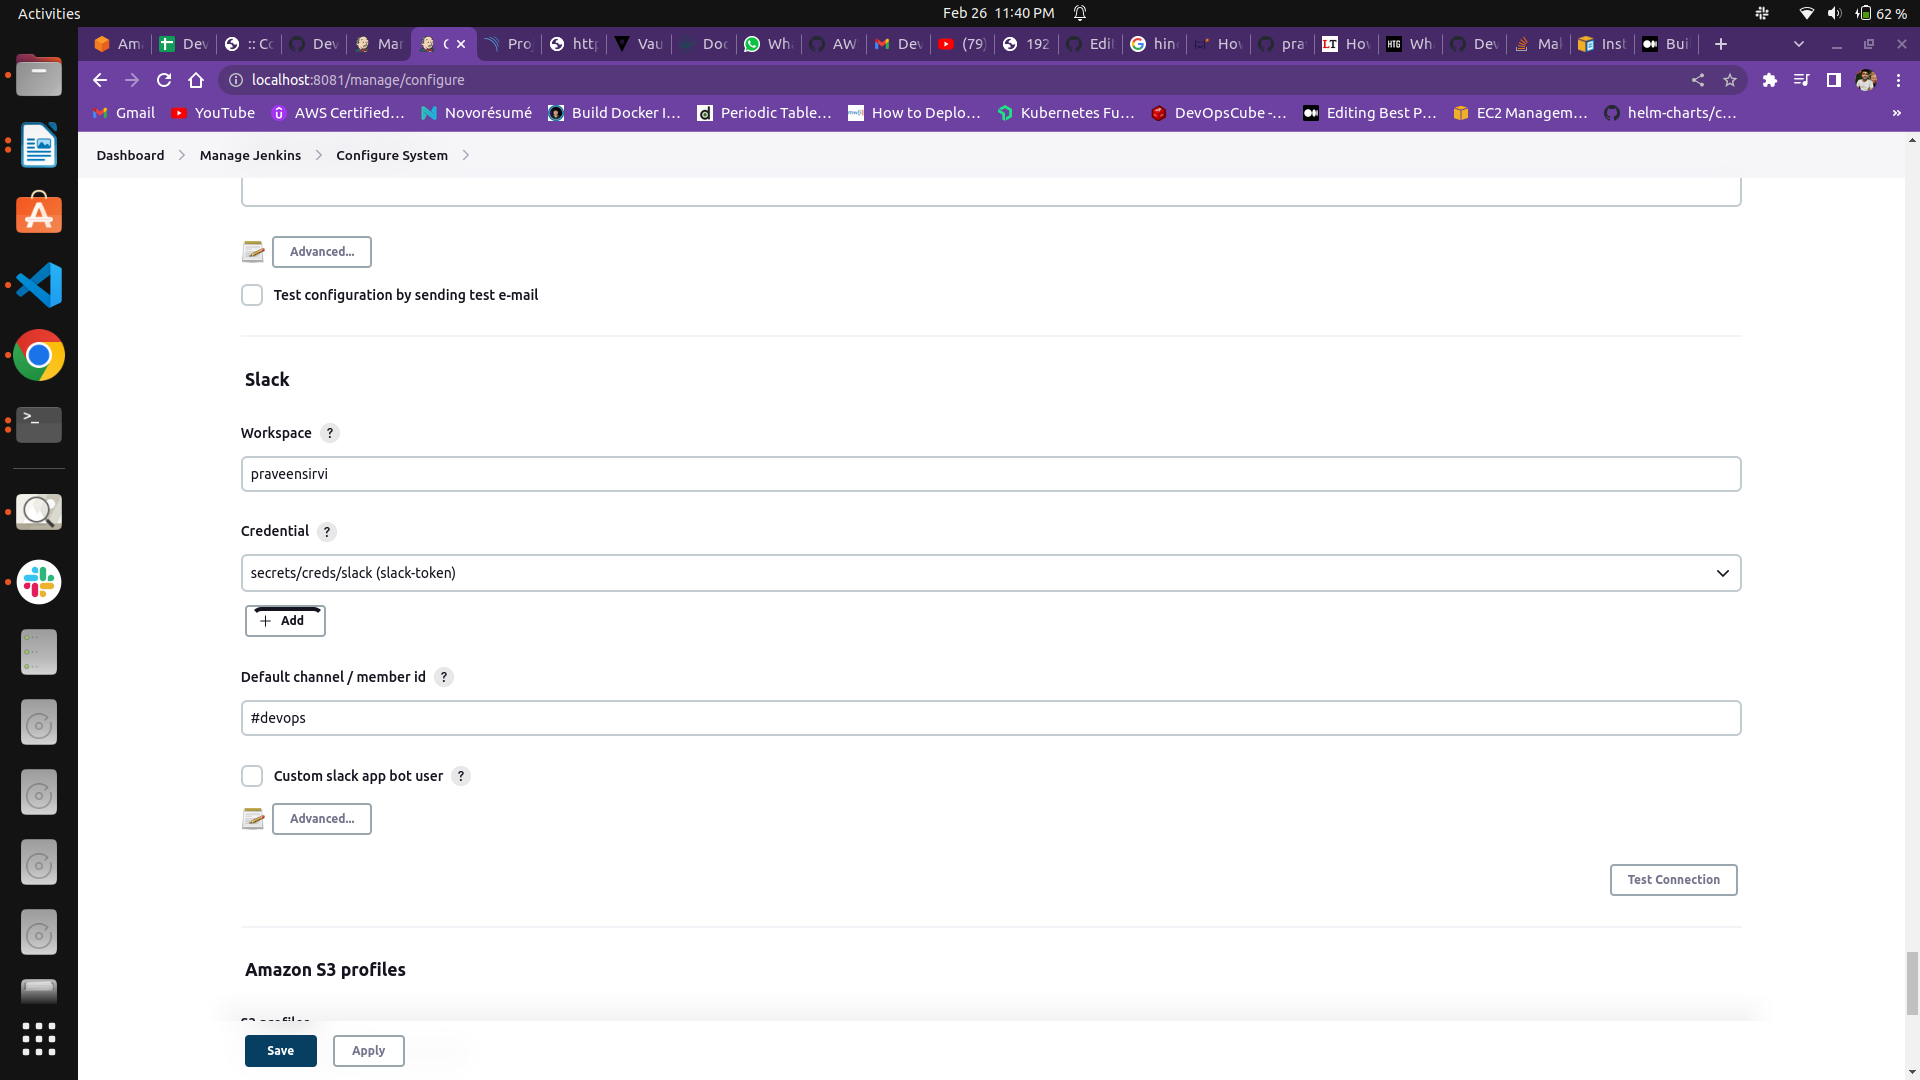
-
workspace – your workspace name ( you create after login into Slack)
-
Credential – attach the slack token
-
Default channel name – write the channel name we created at the time of slack installation like - #cicd-pipeline
-
Apply and save
Stage-06: GitHub integration with Jenkins ( application code repo)
Section titled “Stage-06: GitHub integration with Jenkins ( application code repo)”- Go to GitHub > go to application code repo > settings
- Go to webhook > Add webhook
- Payload URL - http://jenkins-server-public-ip-with-port/github-webhook/
- Click on Add Webhook
Done with the integration of tools with jenkins, Now will we integrate tools with ArgoCD
Step: 5 Integrate ArgoCD with GitHub and Slack for CD
Section titled “Step: 5 Integrate ArgoCD with GitHub and Slack for CD”Stage-01: ArgoCD integration with Github ( k8s manifest repo)
Section titled “Stage-01: ArgoCD integration with Github ( k8s manifest repo)”- access the argocd UI – node public ip and node port
- user username as
admin - for password run this command
kubectl -n argocd get secret argocd-initial-admin-secret -o yaml- copy the password and decode it using
echo “copied-password” | base64 -d- Copy the decoded password and login into argocd
- Go to User Info – update password
- Now go to Application
- Click on New Application
- Give app name
- Chose Project Name as default
- SYNC Policy – Automatic
- enable PRUNE RESOURCES and SELF HEAL
- SOURCE-
- Repository URL – give your repo URL where you stored the k8s manifest
- Path – yamls
- DESTINATION -
- Cluster Url – chose default
- namespace- default
- click on create
Stage-02: Slack integration with ArgoCD
Section titled “Stage-02: Slack integration with ArgoCD”- encode your Slack token using this command ( Bot Token )
echo "your-slack-token" | base64- edit
argocd-notifications-secretsecret to add slack token
kubectl -n argocd edit secret argocd-notifications-secret- Add data field after
apiVersion: v1, Replacexxxx-xxxxx-xxwith your encoded slack token
data: slack-token: xxxxx-xxxxxx-xxxxxx- now edit
argocd-notifications-cmconfigmap
kubectl -n argocd edit cm argocd-notifications-cm- add this service for slack after
apiVersion: v1
data: service.slack: | token: $slack-token username: argocd-bot icon: ":rocket:" template.app-sync-succeeded-slack: "message: | \n Application {{.app.metadata.name}} is now {{.app.status.sync.status}}\n" trigger.on-sync-succeeded: | - when: app.status.sync.status == 'Synced' send: [app-sync-succeeded-slack]- add slack notification annotation in application
kubectl -n argocd edit application your-app-name-you-created-in-argocd- add this annotation in metadata section like this
apiVersion: argoproj.io/v1alpha1kind: Applicationmetadata: annotations: notifications.argoproj.io/subscribe.on-sync-succeeded.slack: your-slack-channel-name name: argocd-demo namespace: argocdStage-03: Prometheus and Grafana Integration
Section titled “Stage-03: Prometheus and Grafana Integration”use this docs to import grafana Dashboard into grafana https://www.DevOpsCloudNinjas.com/2022/05/how-to-setup-monitoring-on-kubernetes.html
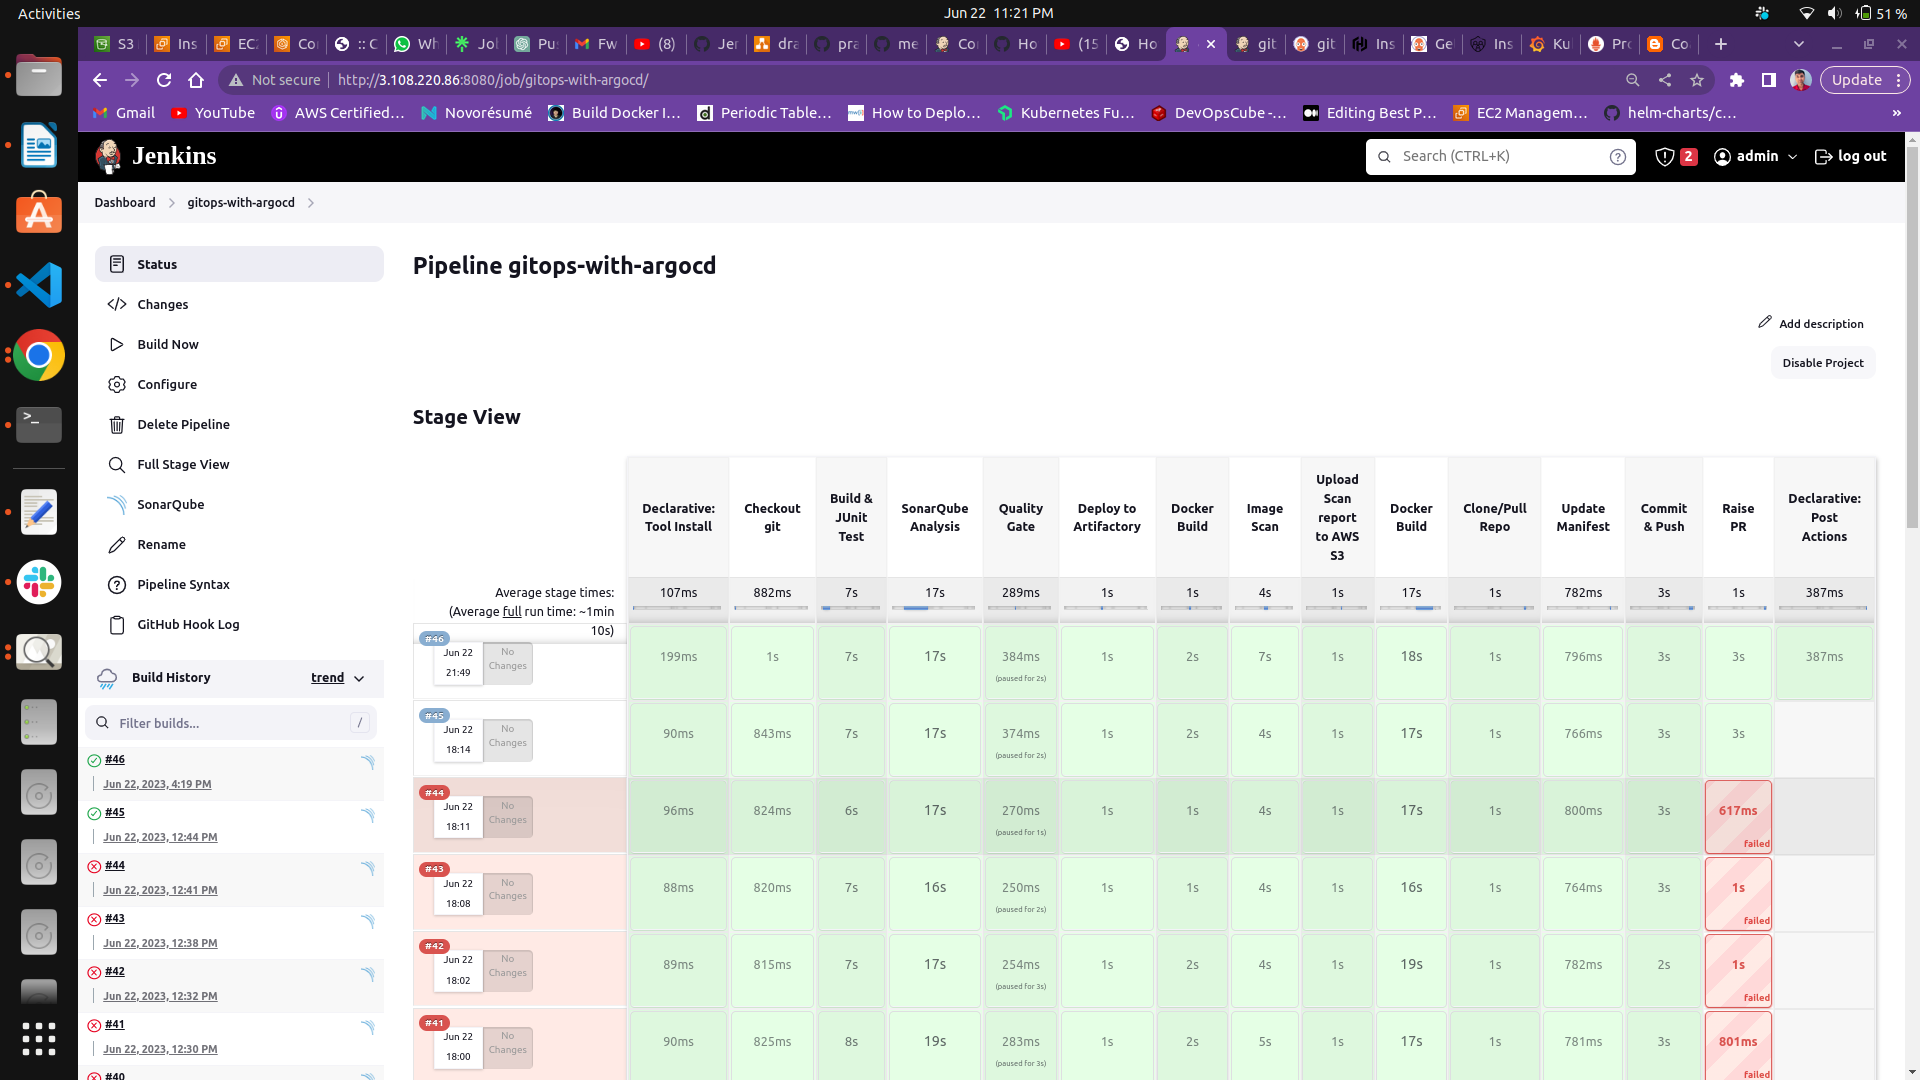
We integrated all the tools with Jenkins, Now Create a declarative jenkins pipeline for each stage.
Step: 6 Pipeline creation
Section titled “Step: 6 Pipeline creation”General Jenkins declarative Pipeline Syntax
Section titled “General Jenkins declarative Pipeline Syntax”pipeline { agent any tools { maven 'apache-maven-3.0.1' } stages { stage('Example') { steps { sh 'mvn --version' } } }}Stage-01 : Git Checkout
Section titled “Stage-01 : Git Checkout”- Define a stage as git checkout
- go to this site https://opensource.triology.de/jenkins/pipeline-syntax/
- search for checkout: check out version control
- give your GitHub URL, branch and generate the pipeline syntax
- paste it into stage steps git check
stage('Checkout git') { steps { git branch: 'main', url:'https://github.com/DevOpsCloudNinjas/DEVOPS_JENKINS_101.git' } }Stage-02: Build and Junit test
Section titled “Stage-02: Build and Junit test”- Define a stage as Build and Junit test
- go to this site https://opensource.triology.de/jenkins/pipeline-syntax/
- search for sh: shell script
- give your shell command and generate the pipeline syntax
- paste it into stage > steps > sh ‘ shell command’
stage ('Build & JUnit Test') { steps { sh 'mvn install' }}Stage-03 : SonarQube Analysis
Section titled “Stage-03 : SonarQube Analysis”In this stage, I used withSonarQubeEnv to Prepare the SonarQube Scanner environment and shell command sh
- Define a stage SonarQube Analysis
- paste the command that we created at the time of the sonarqube project creation
stage('SonarQube Analysis'){ steps{ withSonarQubeEnv('SonarQube-server') { sh '''mvn clean verify sonar:sonar \ -Dsonar.projectKey=gitops-with-argocd \ -Dsonar.projectName='gitops-with-argocd' \ -Dsonar.host.url=$sonarurl \ -Dsonar.login=$sonarlogin''' } } }Stage-04 : Quality gate
Section titled “Stage-04 : Quality gate”This step pauses Pipeline execution and waits for the previously submitted SonarQube analysis to be completed and returns quality gate status. Setting the parameter abortPipeline to true will abort the pipeline if the quality gate status is not green.
- Define a stage as a Quality gate
- go to this site https://opensource.triology.de/jenkins/pipeline-syntax/
- search for waitForQualityGate: Wait for SonarQube analysis to be completed and return quality gate status
- generate pipeline syntax and paste it into steps
- timeout is optional
stage("Quality Gate") { steps { timeout(time: 1, unit: 'HOURS') { waitForQualityGate abortPipeline: true } } }Stage-05 : Jfrog Artifactory
Section titled “Stage-05 : Jfrog Artifactory”- We wrap the steps in a script block to execute them as a Groovy script.
- Inside the try block, we create a reference to the Artifactory server using the Artifactory.newServer method. You need to provide the URL of your Artifactory instance and the credentials ID configured in Jenkins.
- We define an uploadSpec as a JSON string, specifying the pattern of files to upload and the target repository in Artifactory.
- We call the server.upload(uploadSpec) method to upload the files to Artifactory based on the specified upload specification.
- If any exception occurs during the upload process, the catch block will be executed, and an error message will be displayed.
steps { script { try { def server = Artifactory.newServer(url: 'http://13.232.95.58:8082/artifactory', credentialsId: 'jfrog-cred') def uploadSpec = """{ "files": [ { "pattern": "target/*.jar", "target": "${TARGET_REPO}/" } ] }""" server.upload(uploadSpec) } catch (Exception e) { error("Failed to deploy artifacts to Artifactory: ${e.message}") } }}Stage-06 : Docker Build
Section titled “Stage-06 : Docker Build”First, write your dockerfile to build docker images. I have posted my dockerfile in the application repo code In this stage, I used the shell command sh to build the docker image
- Define a stage Docker Build
- go to this site https://opensource.triology.de/jenkins/pipeline-syntax/
- search for sh: shell script
- give your shell command to build image > generate pipeline syntax
- I used the build-id of jenkins and git commit id for versions of docker images
stage('Docker  Build') {            steps {                 sh 'docker build -t ${IMAGE_REPO}/${NAME}:${VERSION}-${GIT_COMMIT} .'
            }        }
Stage-07: Trivy Image scan
Section titled “Stage-07: Trivy Image scan”In this stage, I trivy shell command sh to scan the docker image
- Define a stage Trivy Image scan
- go to this site https://opensource.triology.de/jenkins/pipeline-syntax/
- search for sh: shell script
- Give your Trivy shell command to scan the docker image
Note – There are 3 types of report output formats of trivy ( Table, JSON, Template). I used HTML template for the output report of the trivy scan
stage('Image Scan') {    steps {        // Scanning the image using Trivy and generating an HTML report        sh 'trivy image --format template --template "@/usr/local/share/trivy/templates/html.tpl" -o report.html ${IMAGE_REPO}/${NAME}:${VERSION}-${GIT_COMMIT}'
        // Assuming you want to push the image to a repository after scanning        // sh 'docker push ${IMAGE_REPO}/${NAME}:${VERSION}-${GIT_COMMIT}'    }}
Stage-08: Upload report generated by trivy to AWS S3
Section titled “Stage-08: Upload report generated by trivy to AWS S3”In this stage, I used the shell command sh to Upload Scan report to AWS S3
- Define a stage Upload report to AWS S3
- first create an AWS s3 bucket
- go to this site https://opensource.triology.de/jenkins/pipeline-syntax/
- search for sh: shell script
- give your shell command to upload the object to aws s3
stage('Upload Scan report to AWS S3') {    steps {        // Uncomment and use these lines if AWS credentials are not set elsewhere in your Jenkins setup        // sh 'aws configure set aws_access_key_id "$AWS_ACCESS_KEY_ID"'        // sh 'aws configure set aws_secret_access_key "$AWS_ACCESS_KEY_SECRET"'        // sh 'aws configure set region "ap-south-1"'        // sh 'aws configure set output "json"'
        // Command to copy the report to an S3 bucket        sh 'aws s3 cp report.html s3://devops-mastepiece/'    }}
Stage-09: Push Docker images to DockerHub
Section titled “Stage-09: Push Docker images to DockerHub”In this stage, I used the shell command sh to push the docker image to the docker hub. I stored Credentials in Vault and accessed them in jenkins using the Vault key. You can store DockerHub credentials in jenkins and use them as environment variables
-
Define a stage Docker images push
-
go to this site https://opensource.triology.de/jenkins/pipeline-syntax/
-
search for sh: shell script
-
give your shell command to push docker images to the docker hub
stage ('Docker Build') {           steps {               withVault(configuration: [skipSslVerification: true, timeout: 60, vaultCredentialId: 'vault-token', vaultUrl: 'http://13.232.53.209:8200'], vaultSecrets: [[path: 'secrets/creds/docker', secretValues: [[vaultKey: 'username'], [vaultKey: 'password']]]]) {
                   sh "docker login -u ${username} -p ${password} "                   sh 'docker push ${IMAGE_REPO}/${NAME}:${VERSION}-${GIT_COMMIT}'           sh 'docker rmi  ${IMAGE_REPO}/${NAME}:${VERSION}-${GIT_COMMIT}'

               }           }       }
Stage-10: Clone/Pull Repo (k8s manifest repo )
Section titled “Stage-10: Clone/Pull Repo (k8s manifest repo )”- In this stage first we check whether the repo already exists or not
- If exists then pull the changes
- If not then will clone the repo
stage('Clone/Pull Repo') {           steps {               script {                   if (fileExists('DevOps_MasterPiece-CD-with-argocd')) {
                       echo 'Cloned repo already exists - Pulling latest changes'
                       dir("DevOps_MasterPiece-CD-with-argocd") {                         sh 'git pull'                       }
                   } else {                       echo 'Repo does not exists - Cloning the repo'                       sh 'git clone -b feature https://github.com/DevOpsCloudNinjas/DevOps_MasterPiece-CD-with-argocd.git'                   }               }           }       }
Stage: 11 Update Manifest
Section titled “Stage: 11 Update Manifest”- used sed command to replace images tag in deployment manifests
stage('Update Manifest') { steps { dir("DevOps_MasterPiece-CD-with-argocd/yamls") { sh 'sed -i "s#praveensirvi.*#${IMAGE_REPO}/${NAME}:${VERSION}-${GIT_COMMIT}#g" deployment.yaml' sh 'cat deployment.yaml' } } }Stage: 12 Commit and Push Changes to the k8s manifest repo
Section titled “Stage: 12 Commit and Push Changes to the k8s manifest repo”- set the global username
- set the remote repo URL
- checkout the branch to feature
- stage the changes
- commit the changes
- push the changes to the feature branch
stage('Commit & Push') { steps { withCredentials([string(credentialsId: 'GITHUB_TOKEN', variable: 'GITHUB_TOKEN')]) { dir("DevOps_MasterPiece-CD-with-argocd/yamls") { sh "git config --global user.email 'praveen@gmail.com'" sh 'git remote set-url origin https://${GITHUB_TOKEN}@github.com/${GIT_USER_NAME}/${GIT_REPO_NAME}' sh 'git checkout feature' sh 'git add deployment.yaml' sh "git commit -am 'Updated image version for Build- ${VERSION}-${GIT_COMMIT}'" sh 'git push origin feature' } } } }Stage: 13 Create Pull Request
Section titled “Stage: 13 Create Pull Request”The reason to create a pull request is that argocd is sync automatically with Git Hub. GitHub is the only single source of truth for argocd. So if jenkins push the changes to the main branch then argocd will deploy changes directly without reviewing the changes. This should not happen in the Production environment. That’s why we create pull requests against the main branch. So a senior person from the team can review the changes and merge them into the main branch. Then n then only changes should go to the production environment.
Here token.txt contain the GitHub token, the reason for storing the GitHub token in the text file bcoz gh auth login --with-token accept only STDIN Input.
stage('Raise PR') {            steps {                withCredentials([string(credentialsId: 'GITHUB_TOKEN', variable: 'GITHUB_TOKEN')]) {                    dir("DevOps_MasterPiece-CD-with-argocd/yamls") {                        sh '''                            set +u                            unset GITHUB_TOKEN                            gh auth login --with-token < token.txt
                        '''                        sh 'git branch'                        sh 'git checkout feature'                        sh "gh pr create -t 'image tag updated' -b 'check and merge it'"                    }                }            }        }
Stage: 14 Post build action
Section titled “Stage: 14 Post build action”In post build action I used Slack notification. After the build jenkins will send a notification message to Slack whether your build success or failure.
-
Go to jenkins > your project > pipeline syntax > search for slacksend: send slack message
-
write your channel name and message > generate pipeline syntax.
Note – I used custom messages for my project. I created a function for Slack notification and called the function into Post build.
Section titled “Note – I used custom messages for my project. I created a function for Slack notification and called the function into Post build.”post{ always{ sendSlackNotifcation() }}Send SlackNotification function
Section titled “Send SlackNotification function”def sendSlackNotifcation(){ if ( currentBuild.currentResult == "SUCCESS" ) { buildSummary = "Job_name: ${env.JOB_NAME}\n Build_id: ${env.BUILD_ID} \n Status: *SUCCESS*\n Build_url: ${BUILD_URL}\n Job_url: ${JOB_URL} \n" slackSend( channel: "#devops", token: 'slack-token', color: 'good', message: "${buildSummary}") } else { buildSummary = "Job_name: ${env.JOB_NAME}\n Build_id: ${env.BUILD_ID} \n Status: *FAILURE*\n Build_url: ${BUILD_URL}\n Job_url: ${JOB_URL}\n \n " slackSend( channel: "#devops", token: 'slack-token', color : "danger", message: "${buildSummary}") }}Find the whole pipeline here
Section titled “Find the whole pipeline here”./JenkinsfileStep: 7 Project Output
Section titled “Step: 7 Project Output”Final outputs of this Project
Section titled “Final outputs of this Project”Jenkins Output :
Section titled “Jenkins Output :”Sorry, I forgot to change the stage name while building the job, but don’t worry I made changes in the Jenkins file.
Sonarqube Output:
Section titled “Sonarqube Output:”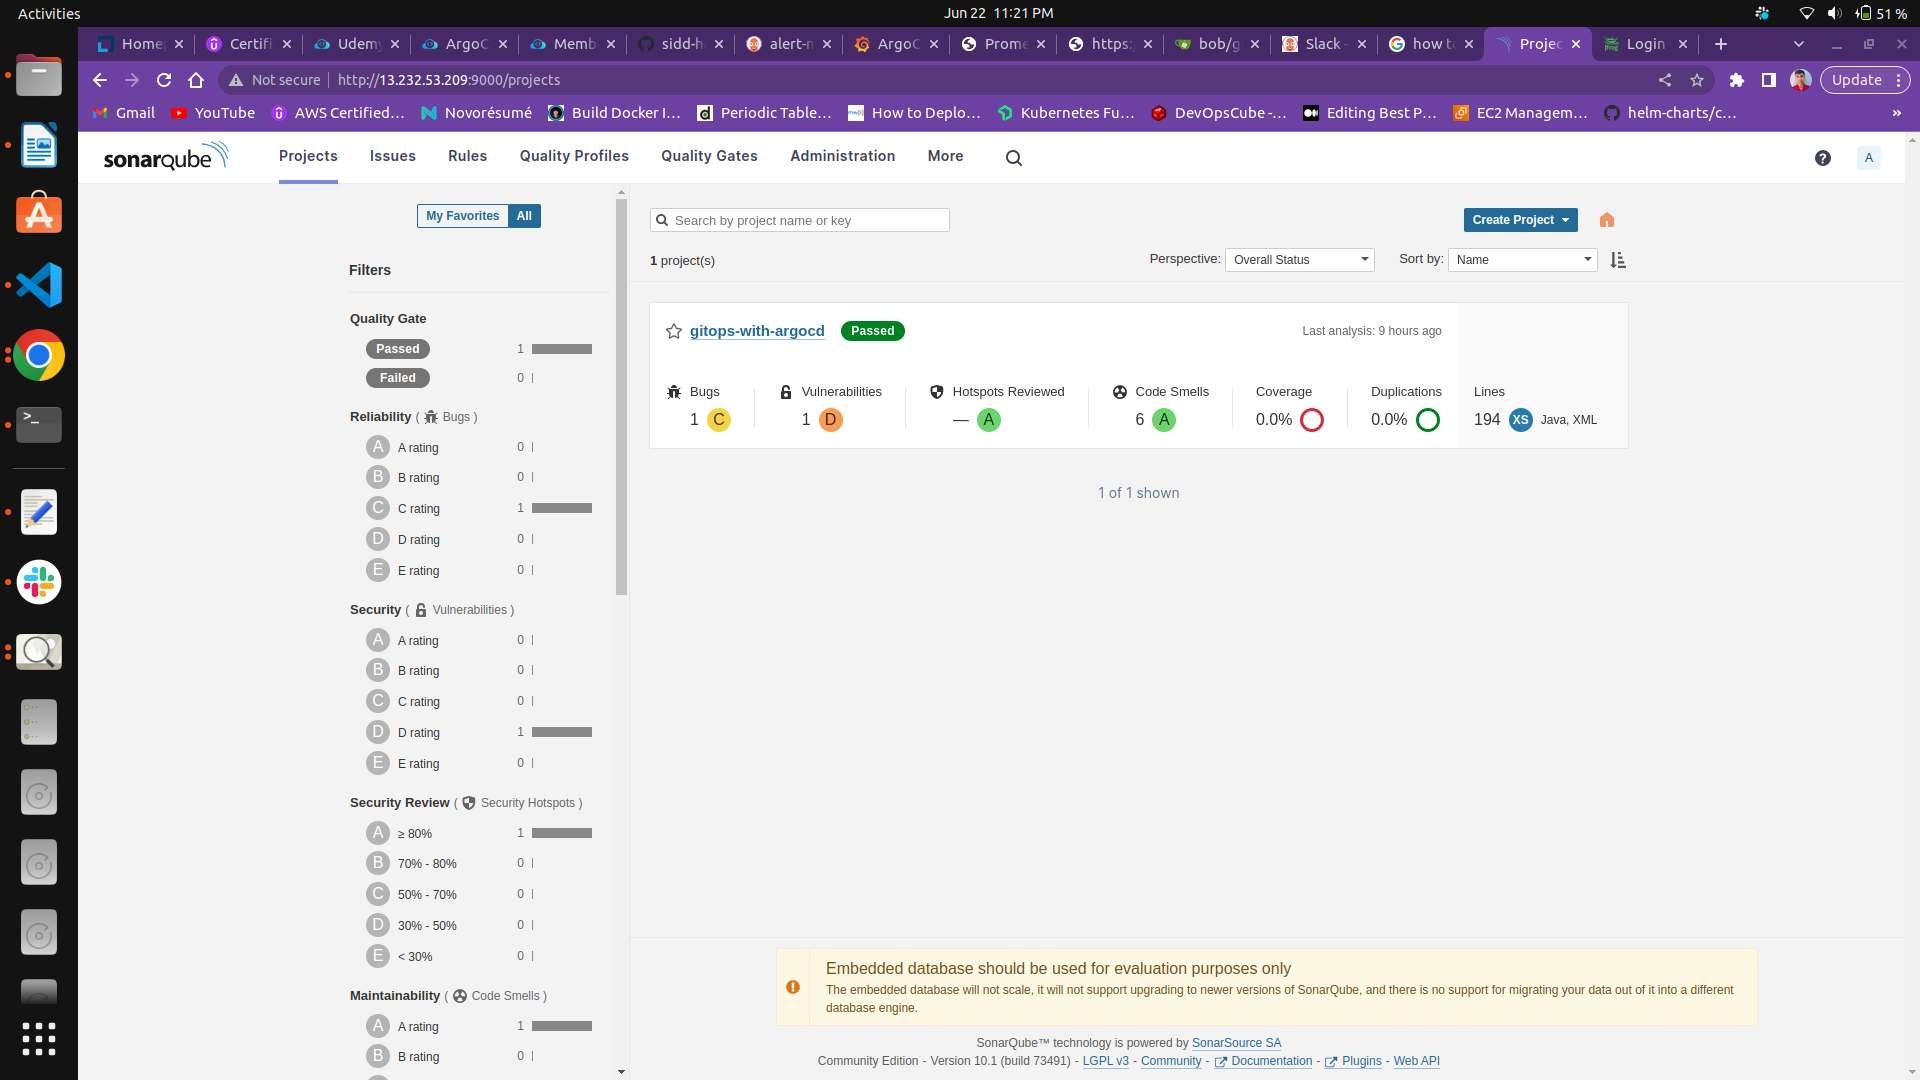
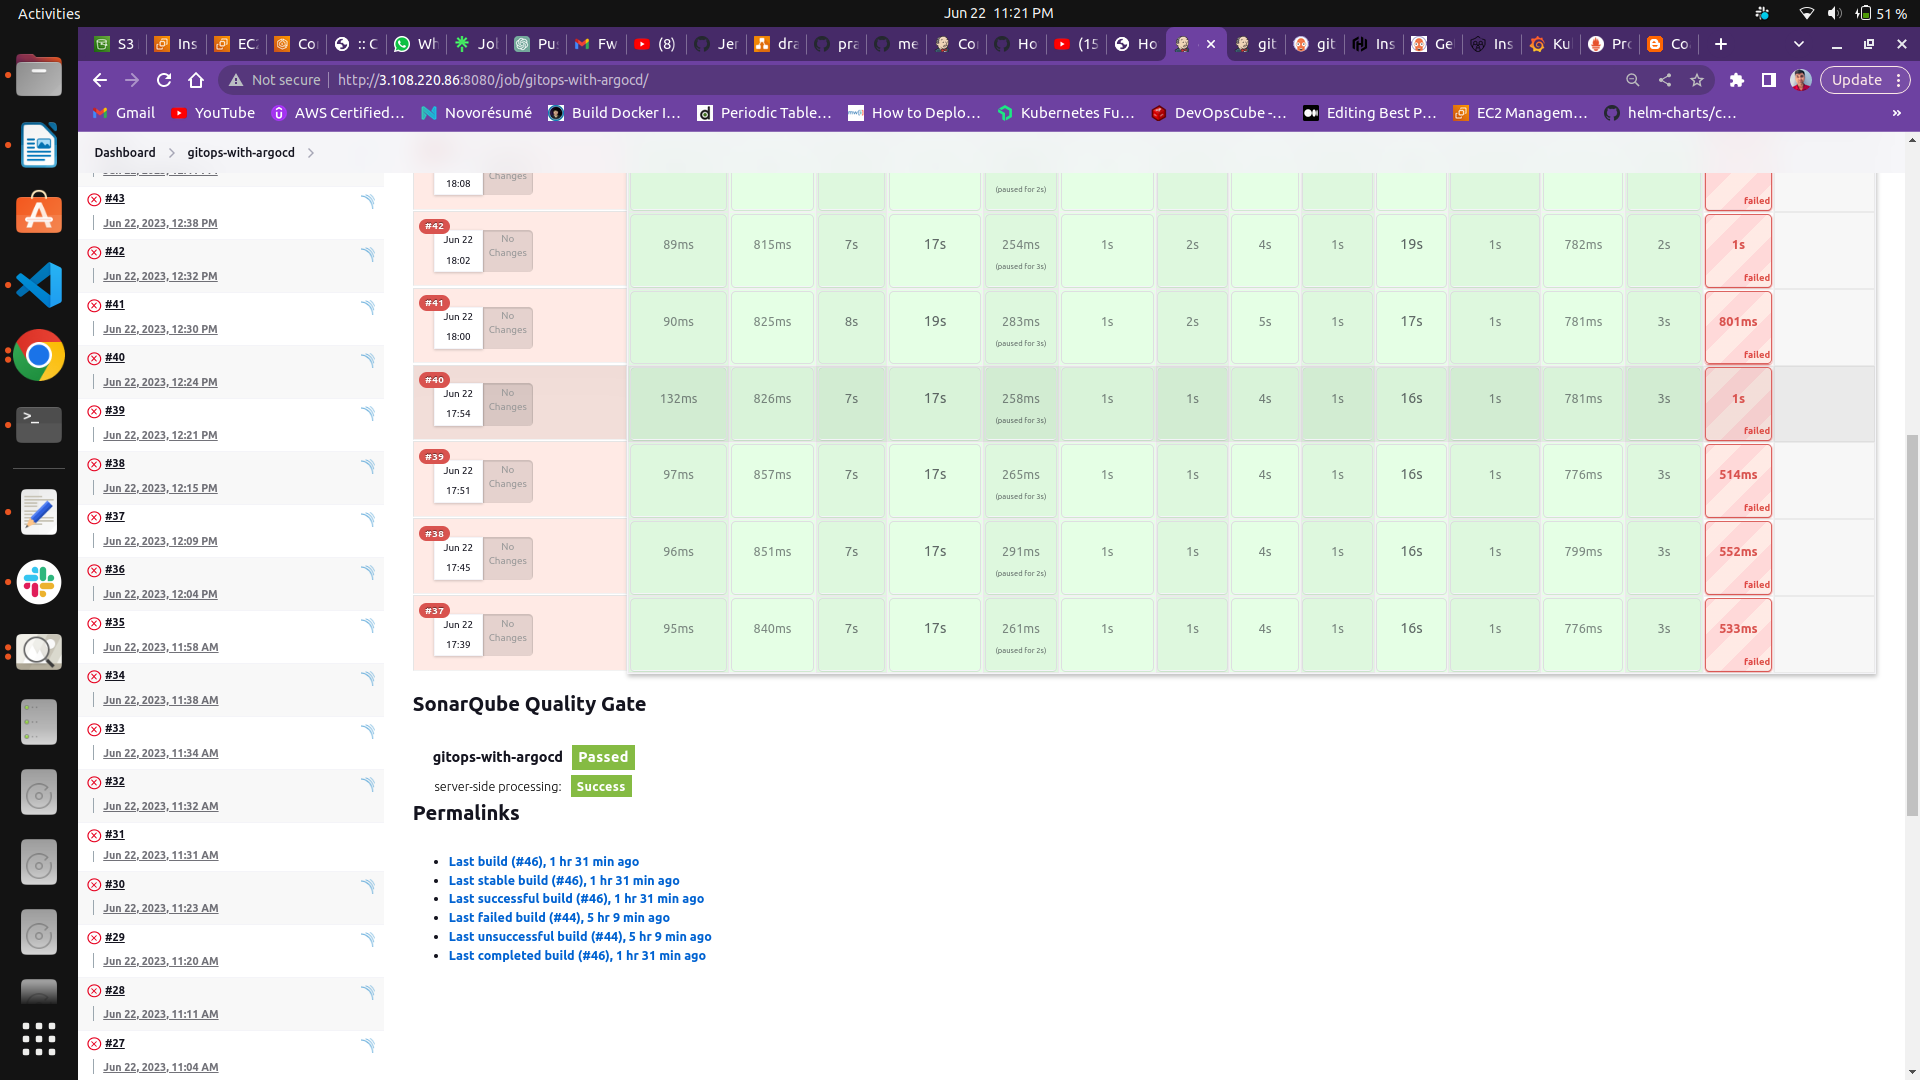
Quality Gate Status in Jenkins
Section titled “Quality Gate Status in Jenkins”SonarQube Quality gate status is green and passed.
You can apply your custom quality gate like there should be zero ( bug, Vulnerability, code smell ) and if your code has greater than 0 (bugs, vulnerability, code smells). Then your quality gate status will become a failure or red. If your quality gate status becomes a failure, stages after the quality gate will be a failure.
Trivy report in AWS S3 push by jenkins
Section titled “Trivy report in AWS S3 push by jenkins”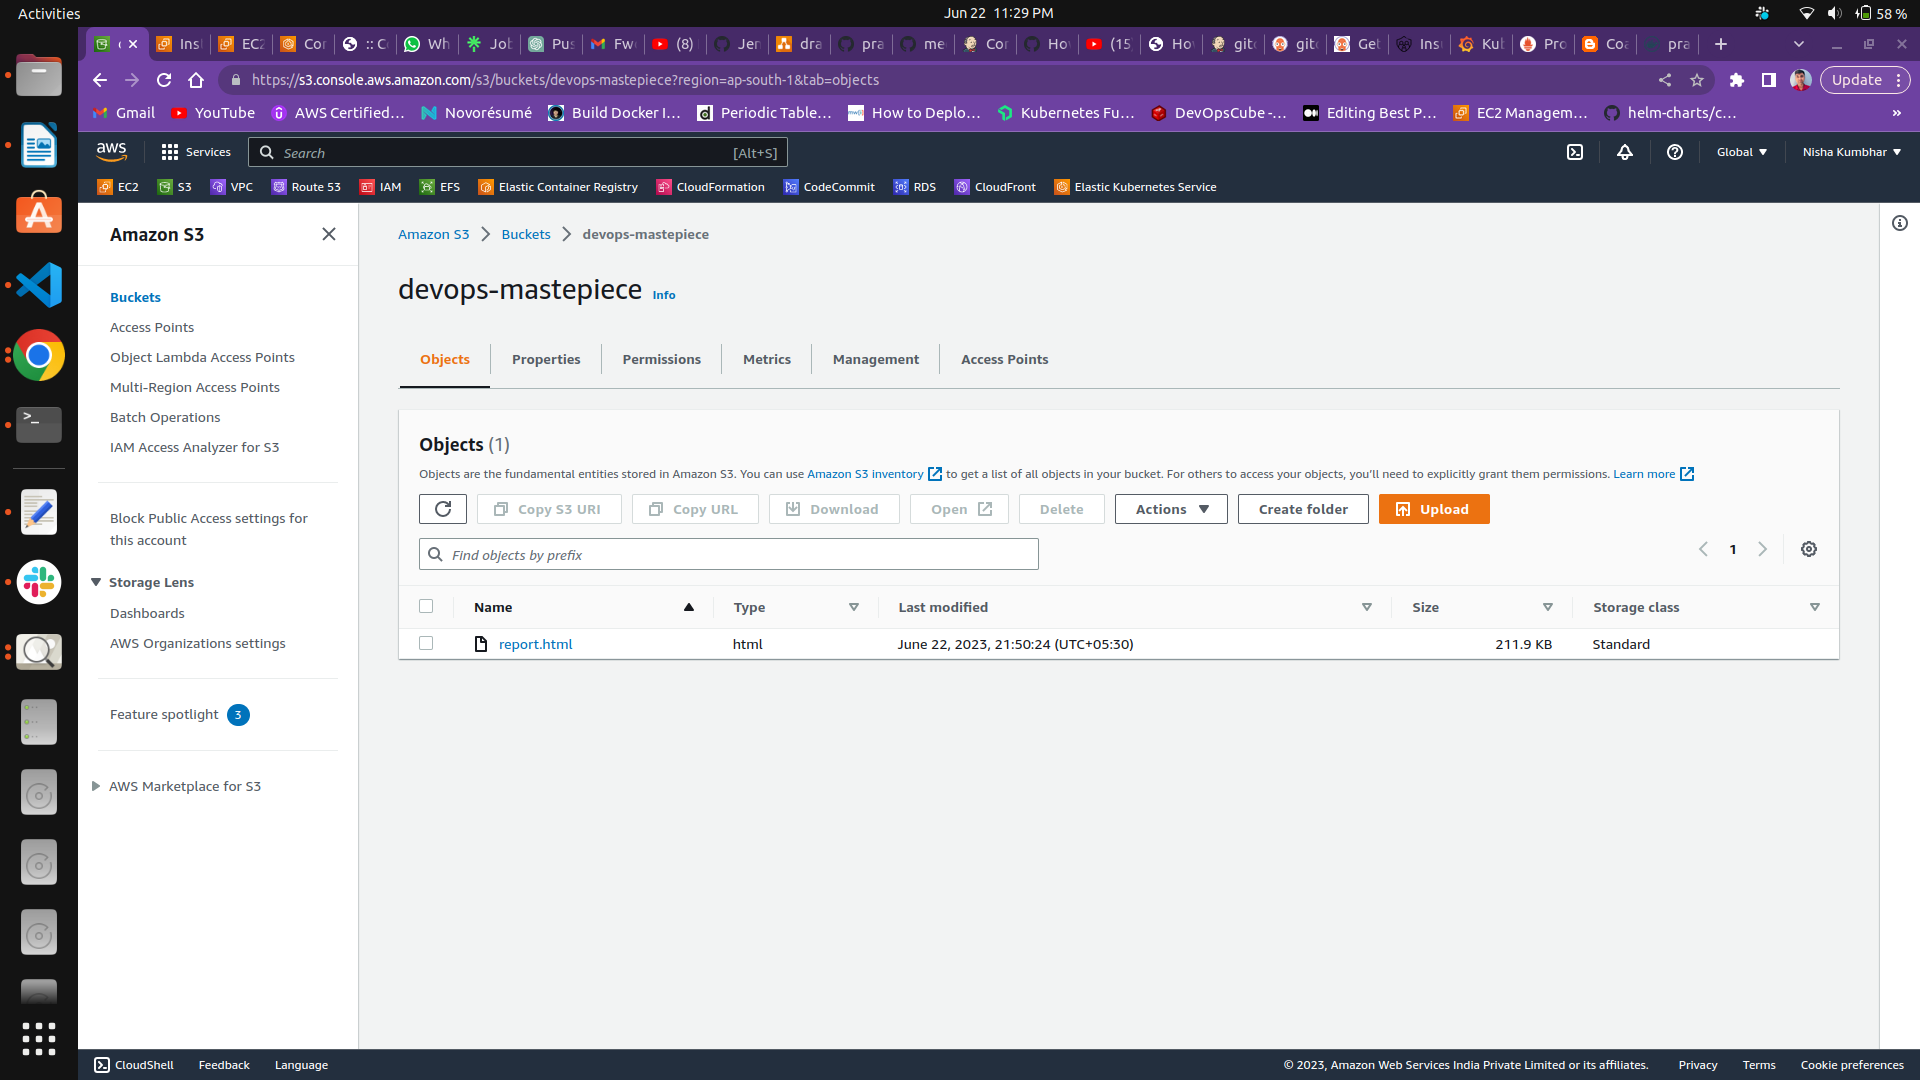
Trivy report
Section titled “Trivy report”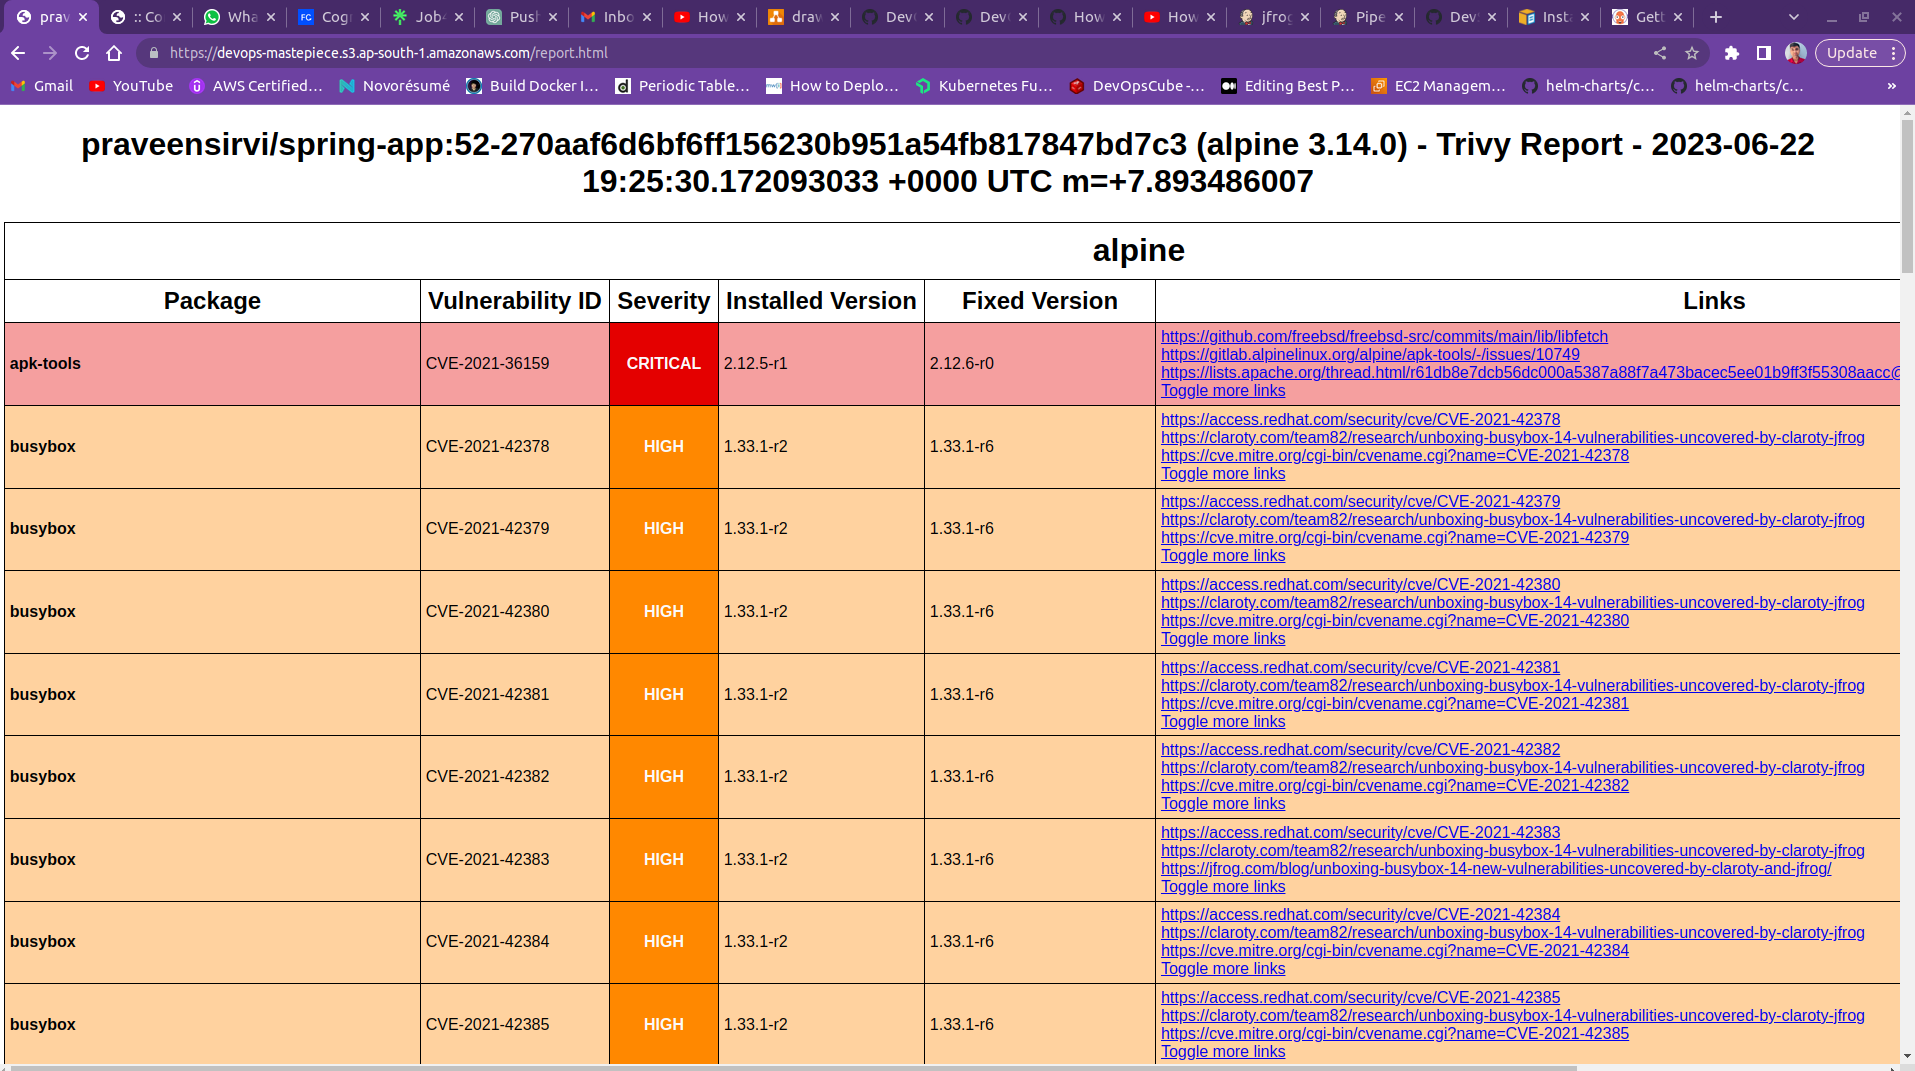
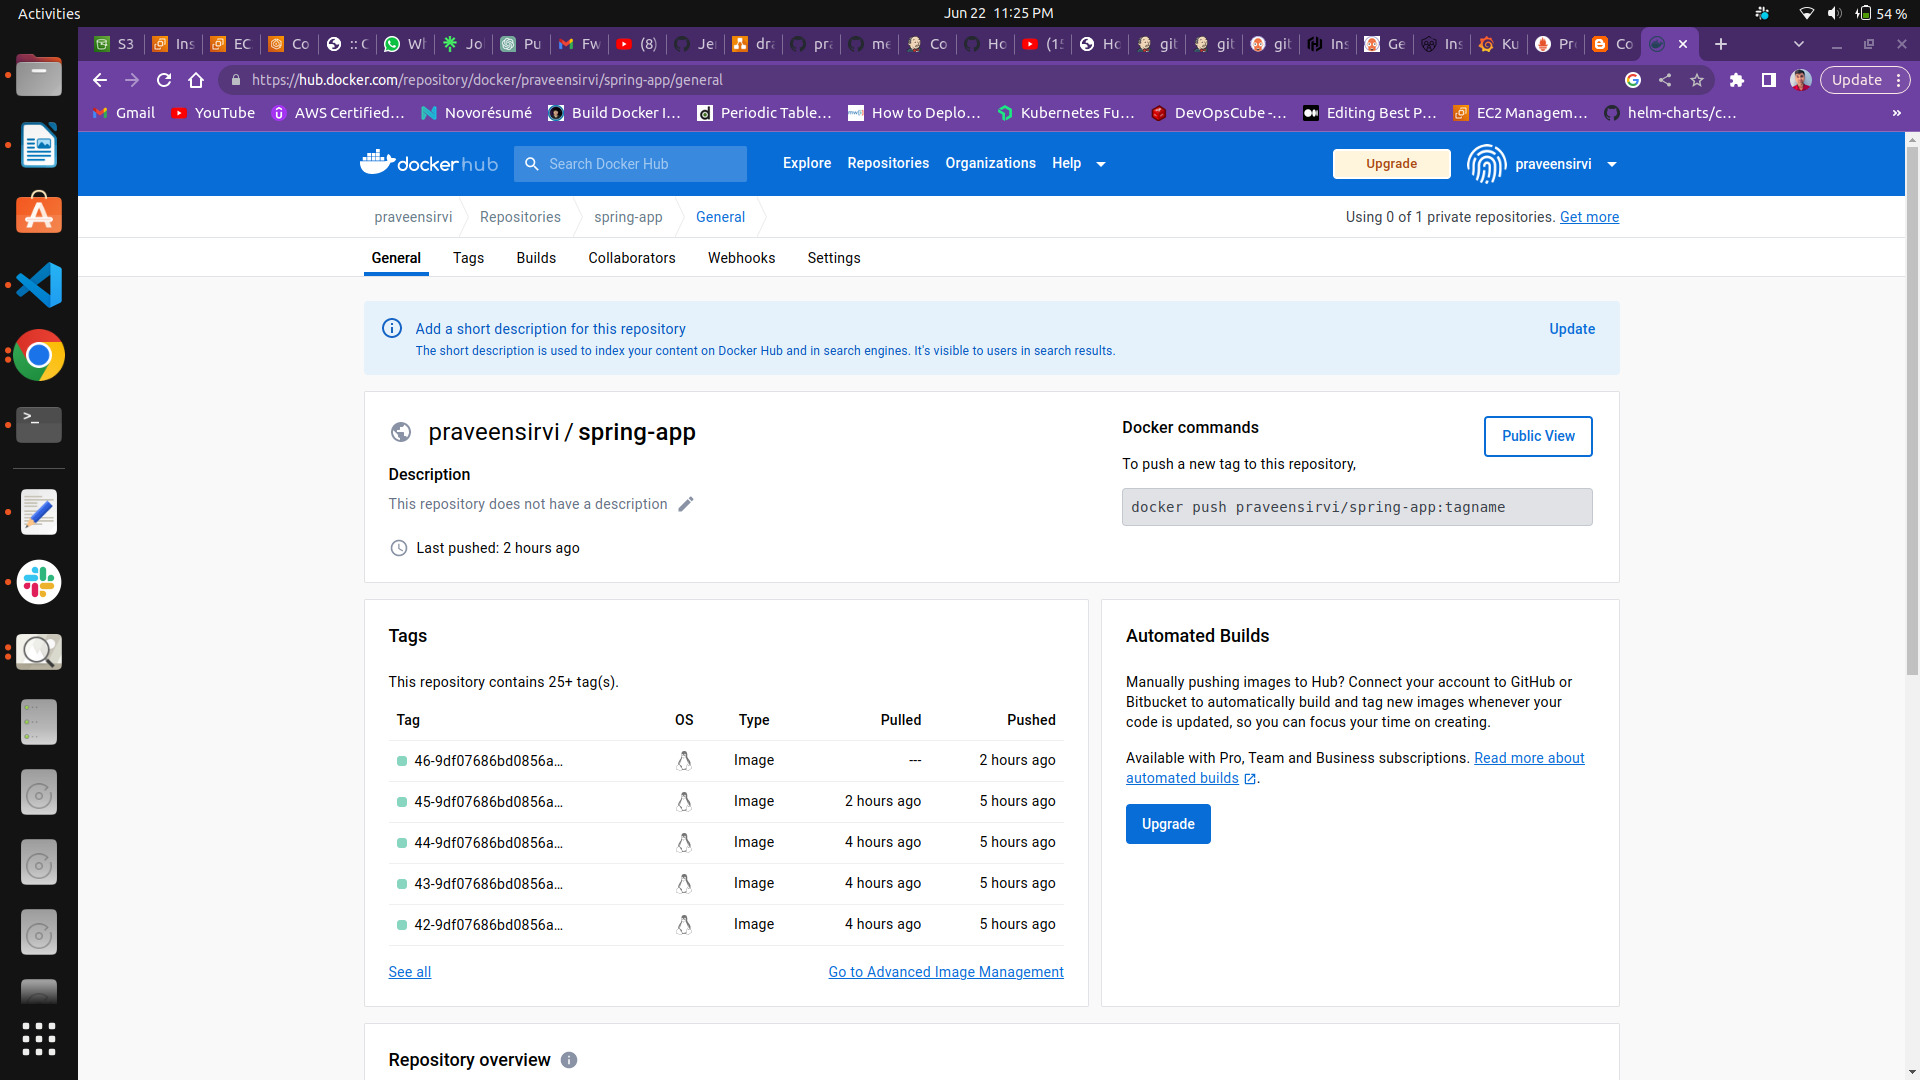
Images in DockerHub pushed by jenkins
Section titled “Images in DockerHub pushed by jenkins”
Image tag updated by jenkins and push changes to feature branch
Section titled “Image tag updated by jenkins and push changes to feature branch”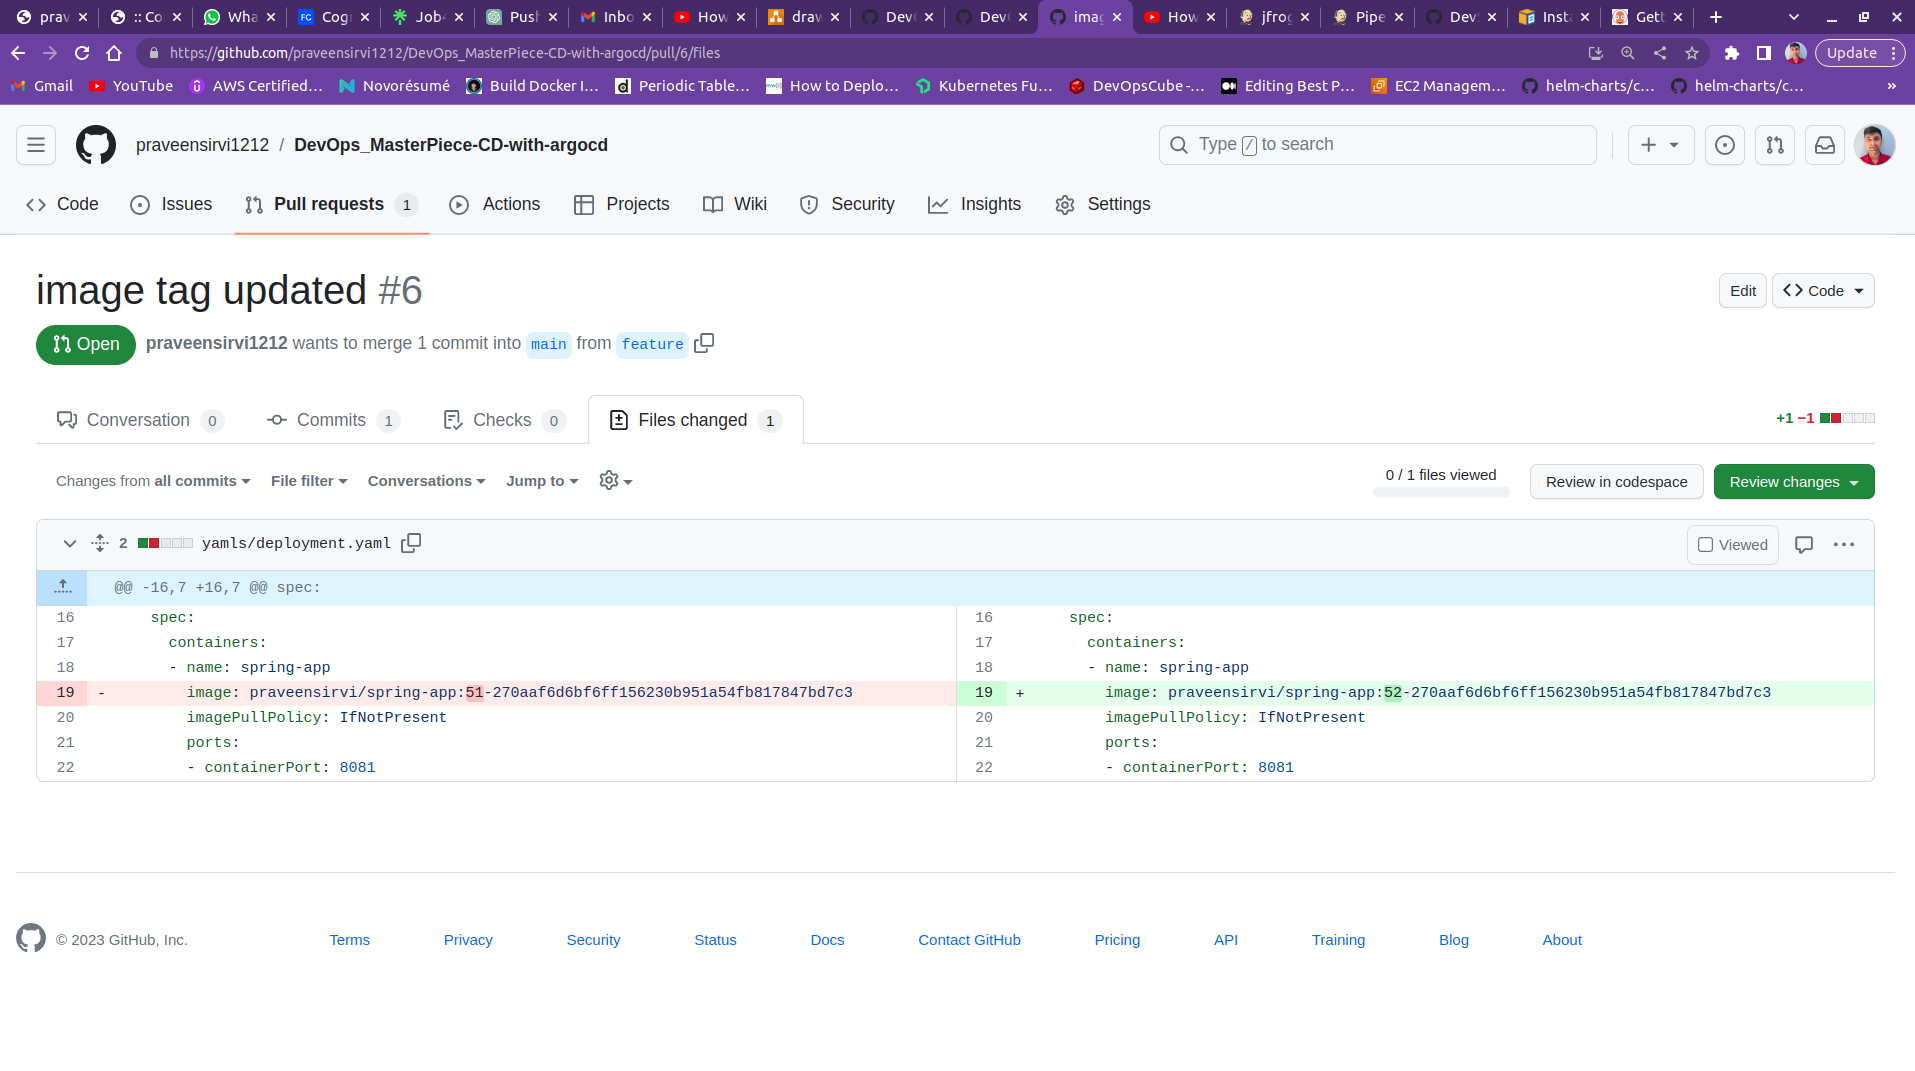
Pull Request created by jenkins in DevOps_MasterPiece-CD-with-argocd GitHub repo
Section titled “Pull Request created by jenkins in DevOps_MasterPiece-CD-with-argocd GitHub repo”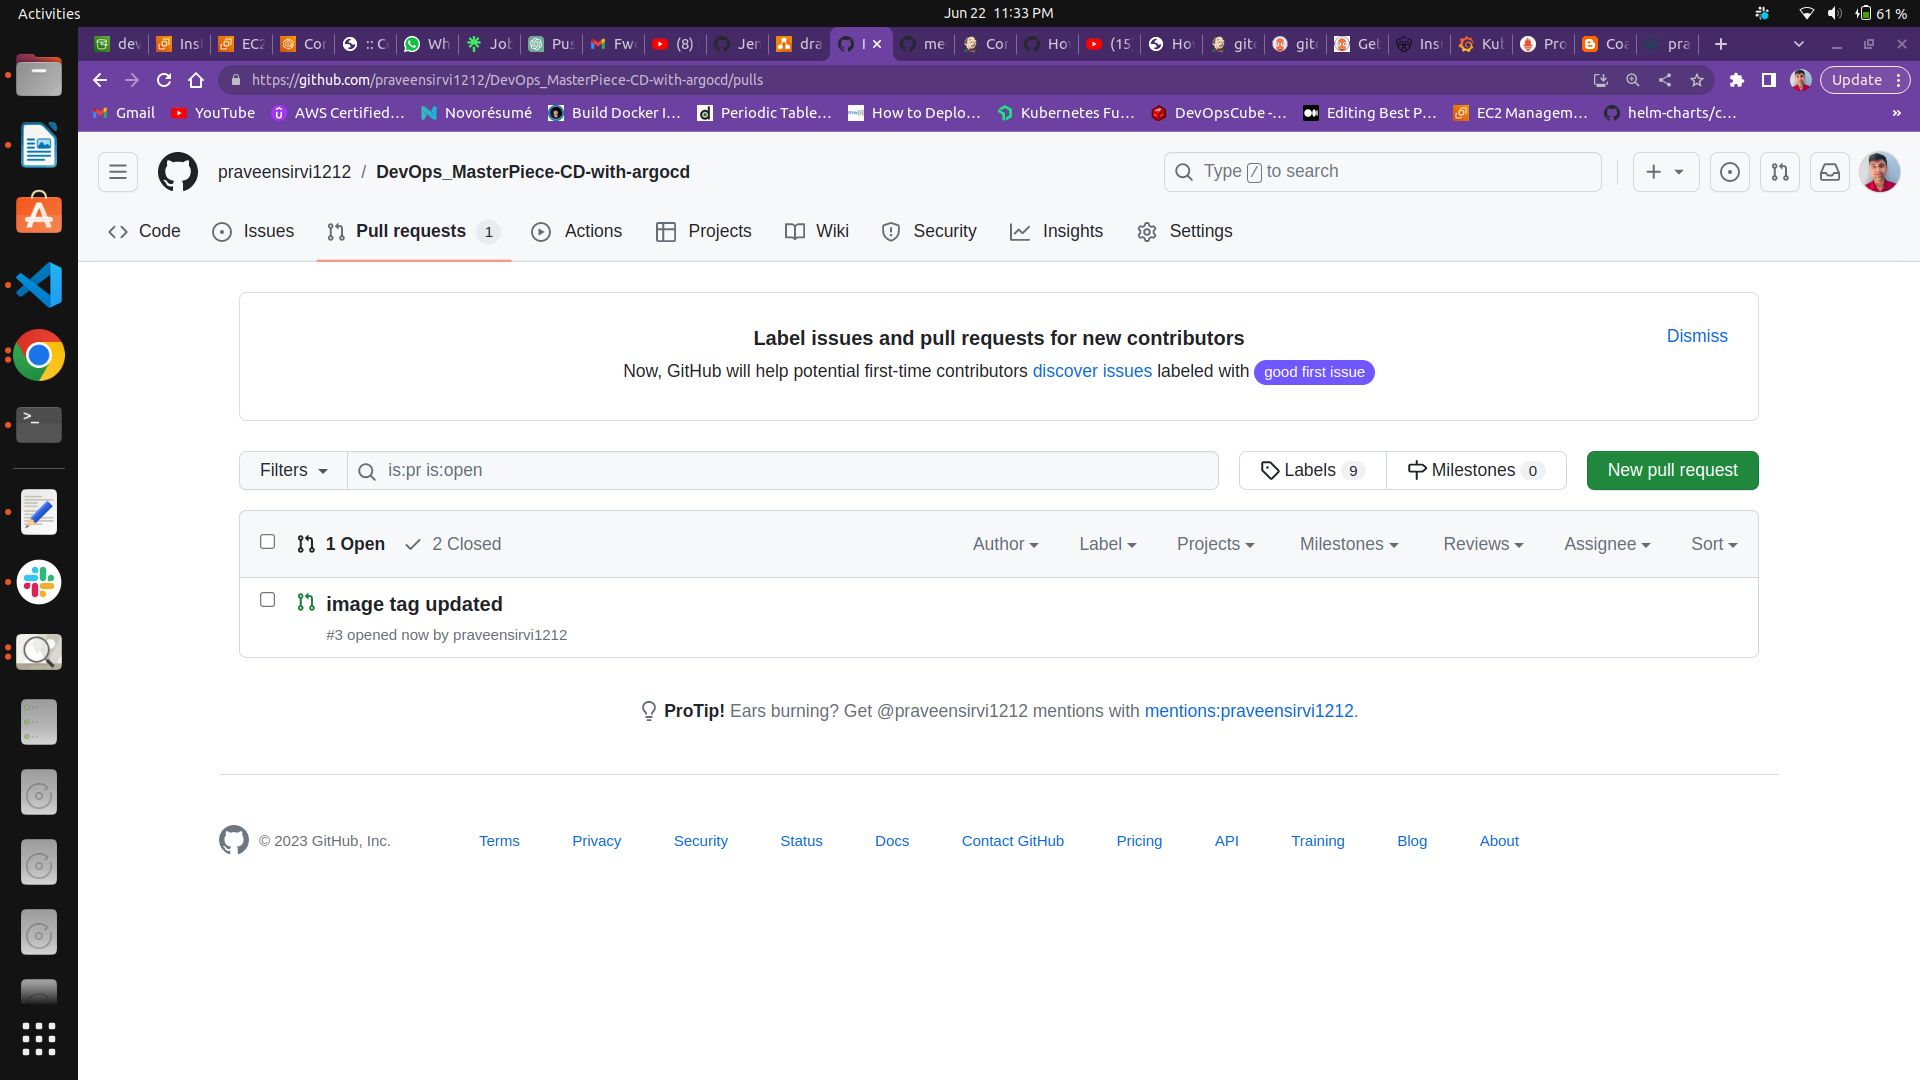
App in ArgoCD
Section titled “App in ArgoCD”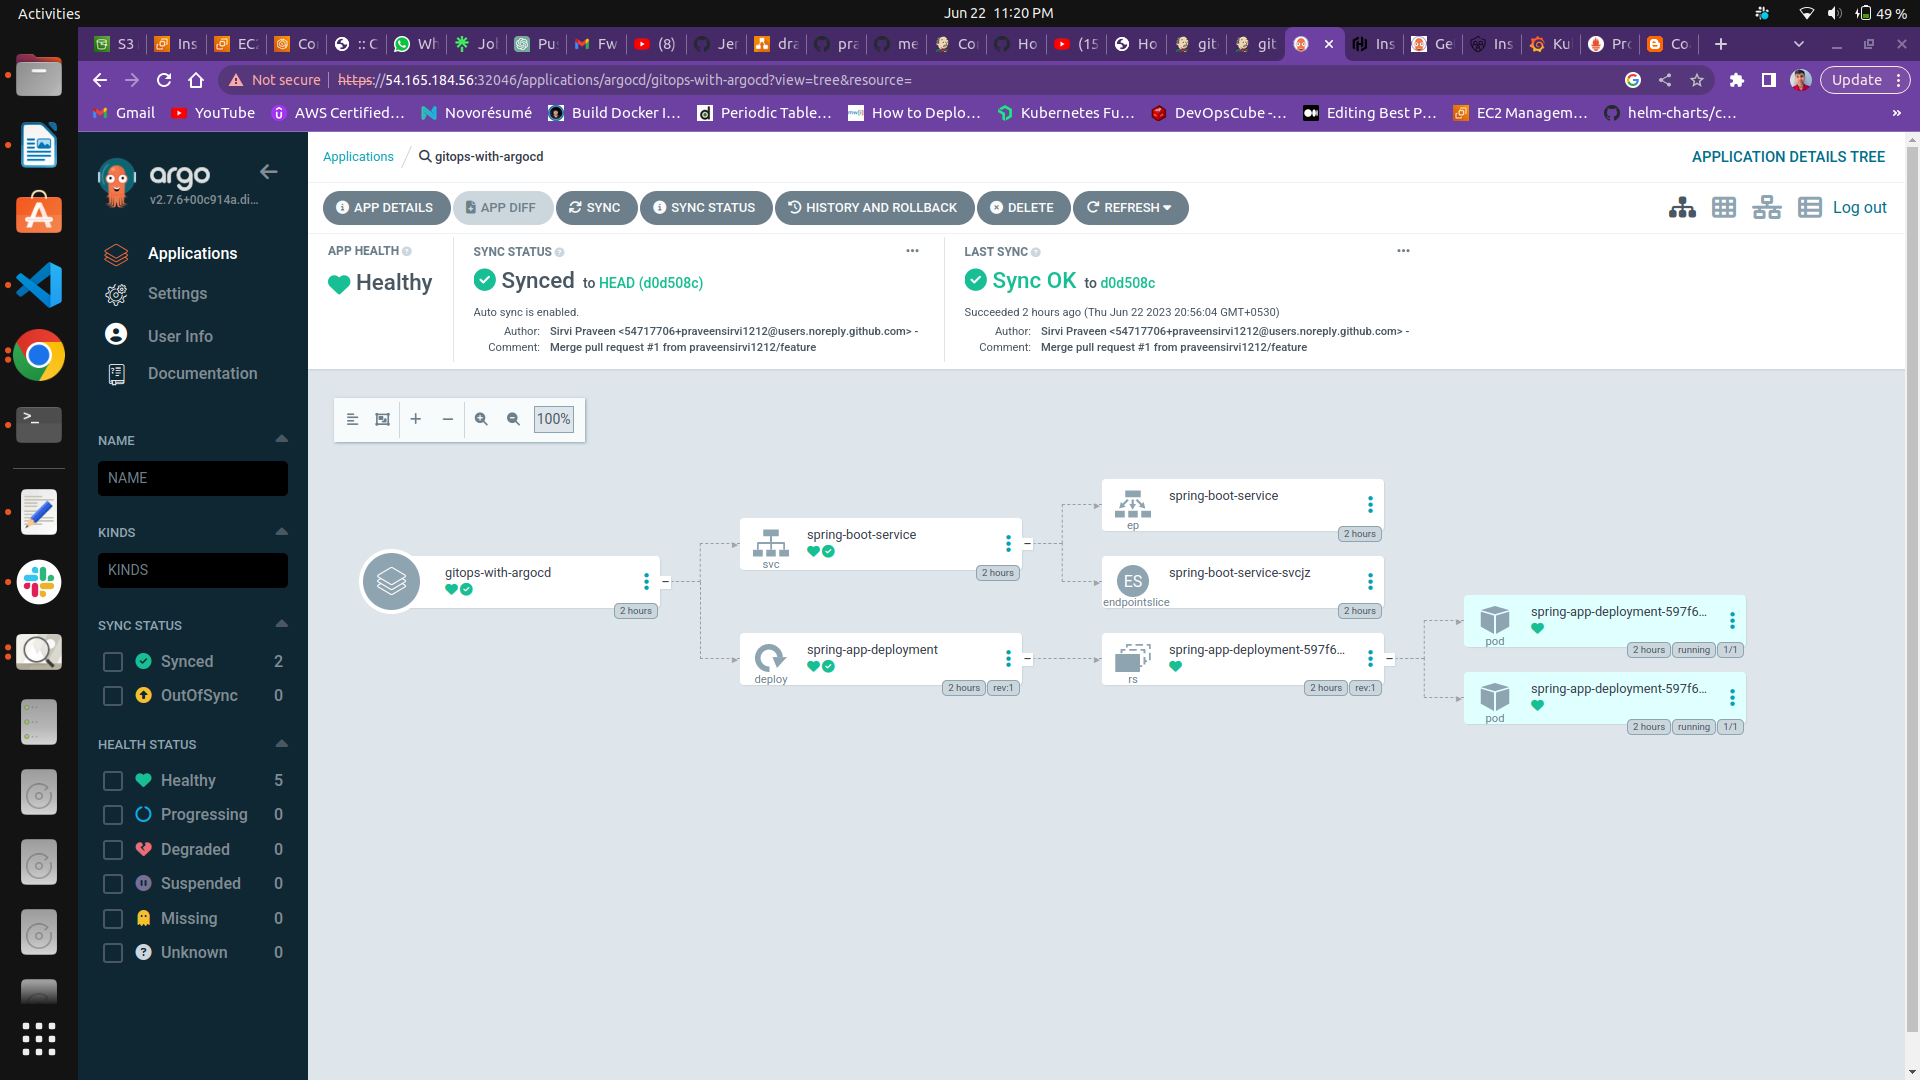
Application output deployed in EKS Cluster by ArgoCD
Section titled “Application output deployed in EKS Cluster by ArgoCD”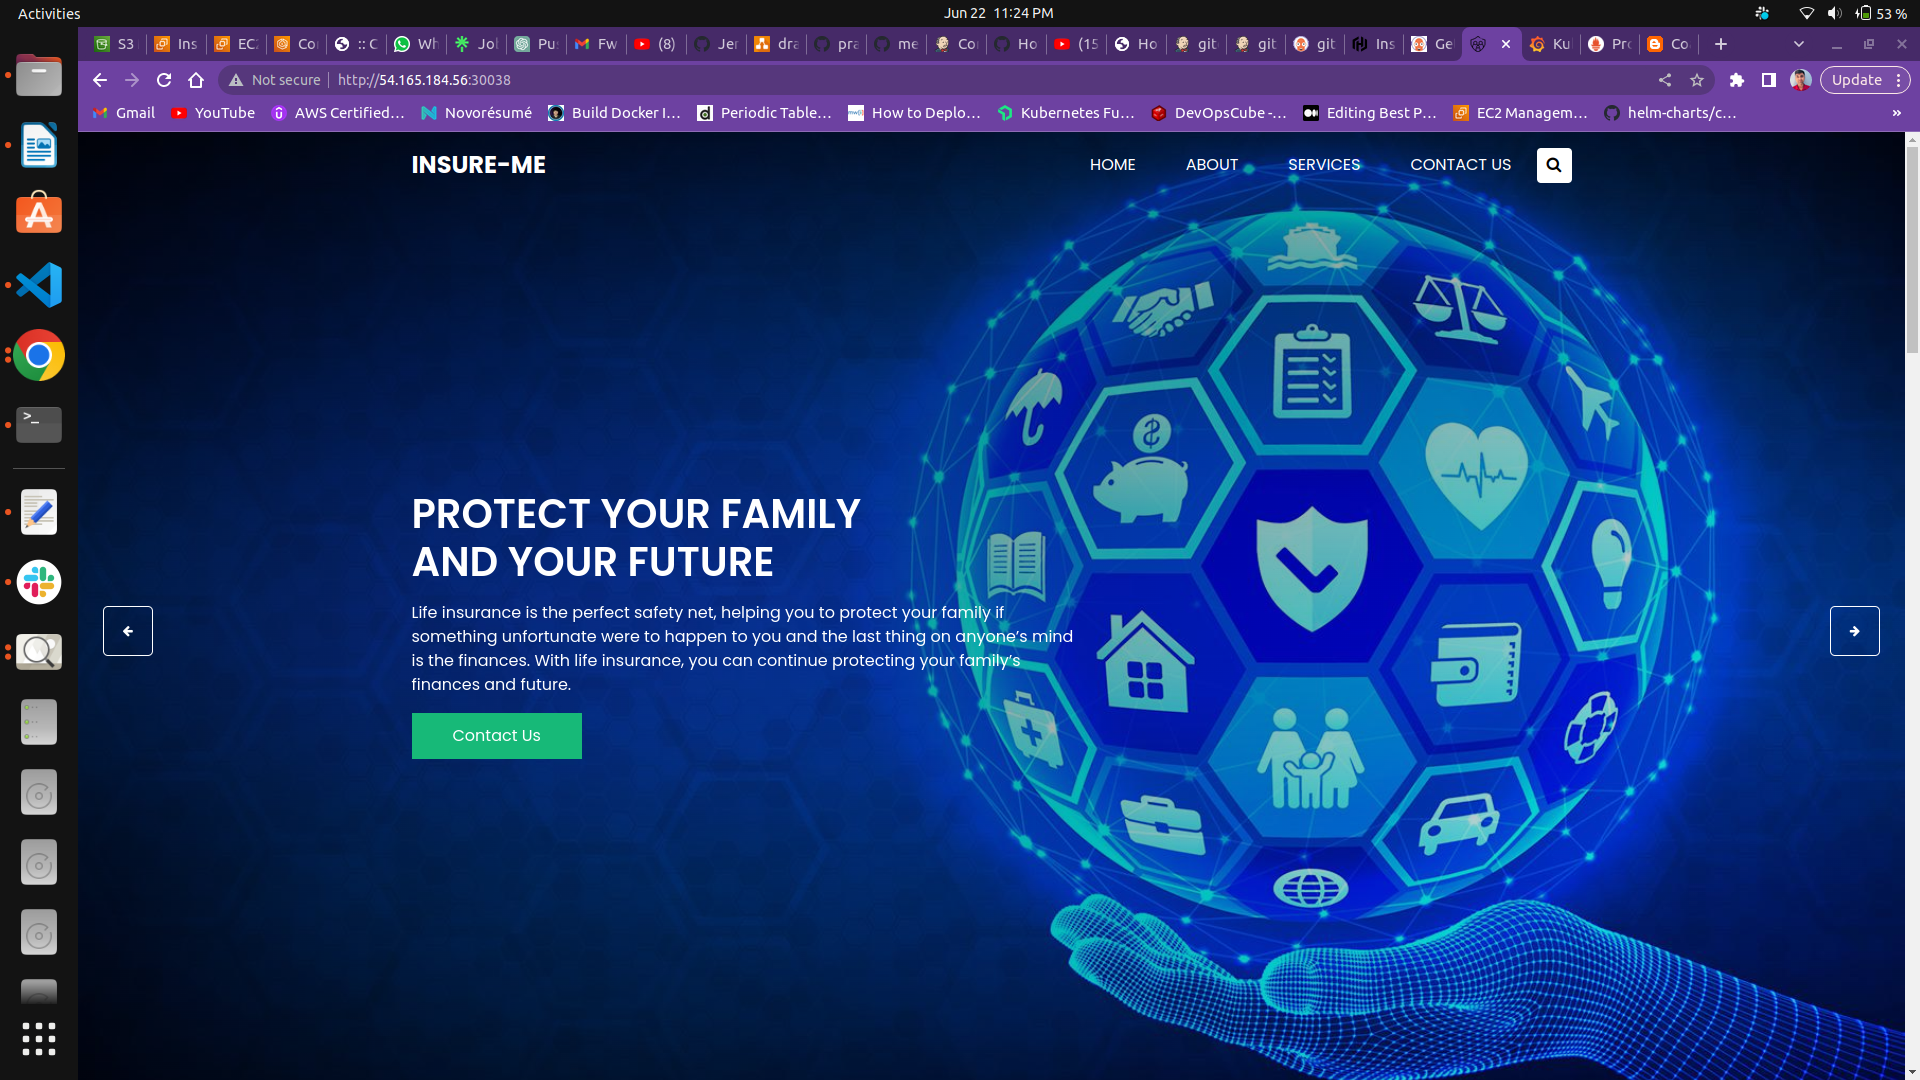
Slack output of jenkins
Section titled “Slack output of jenkins”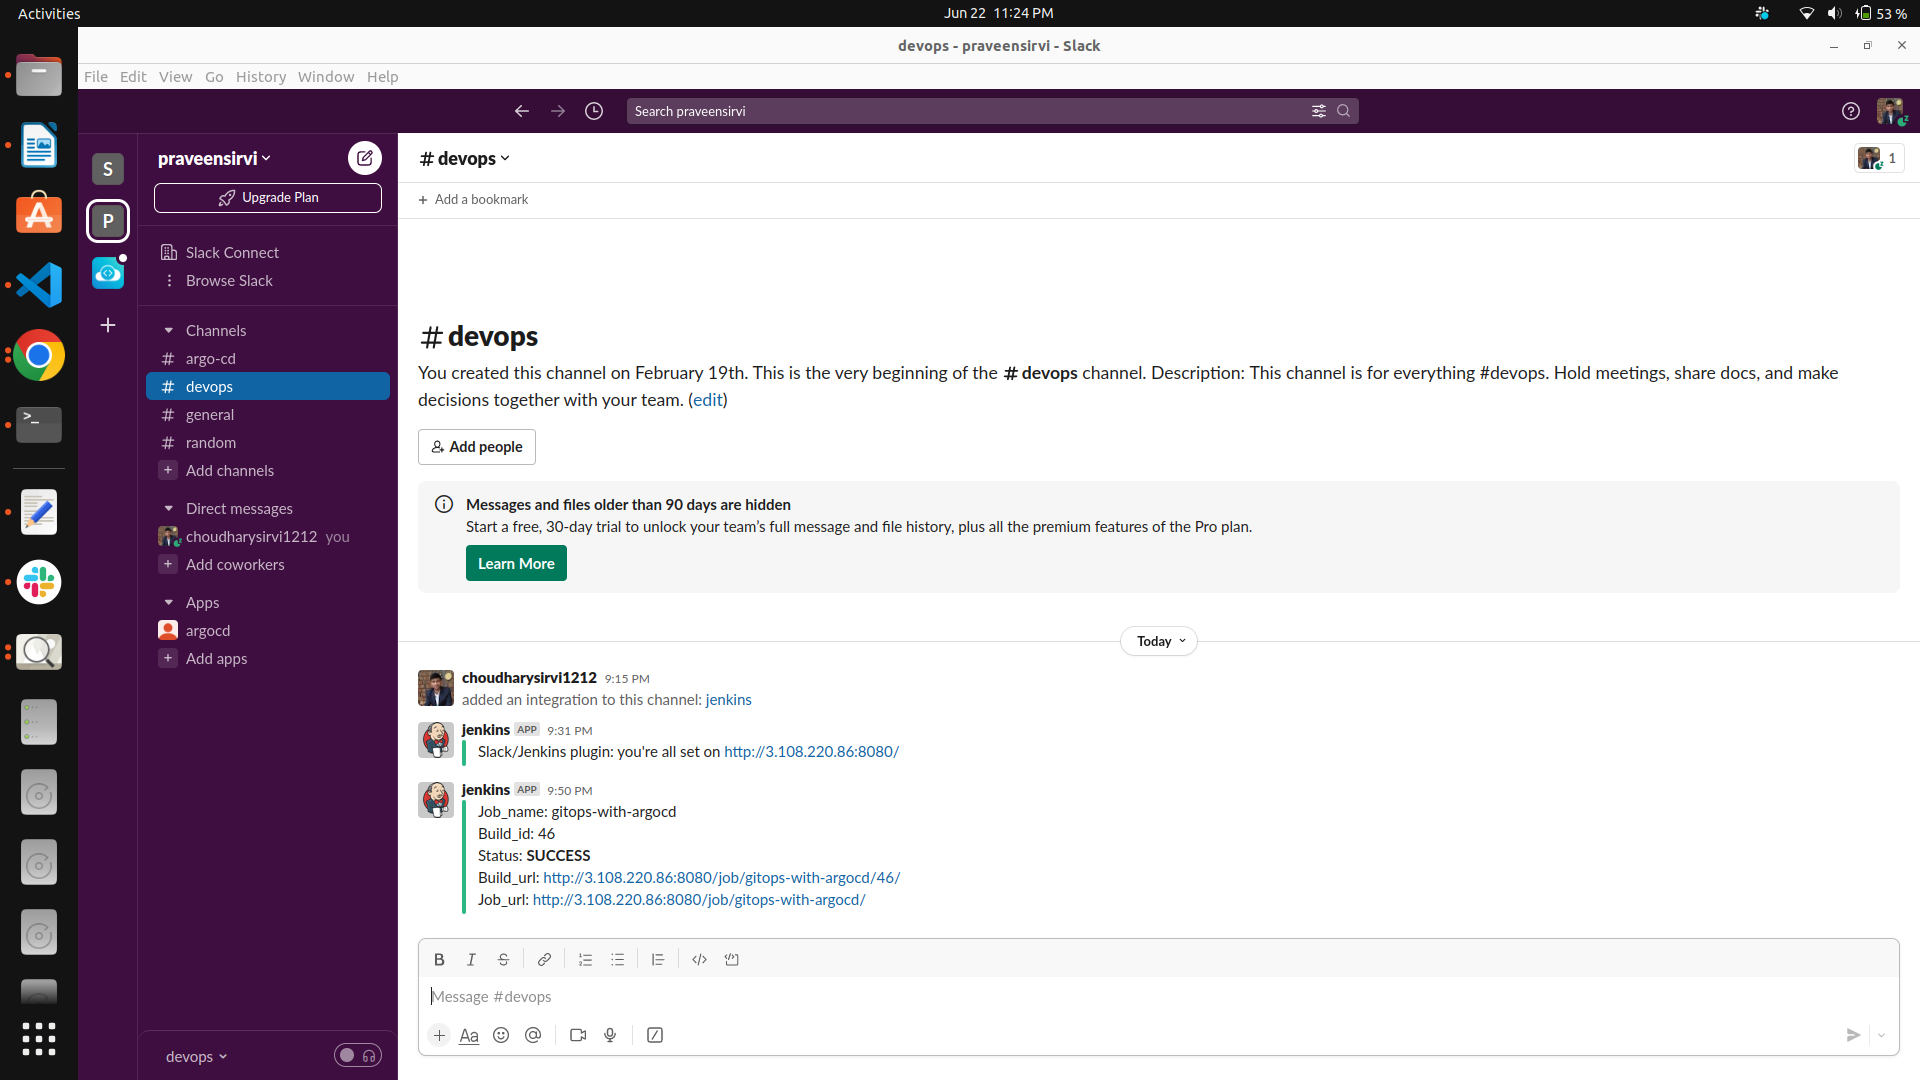
Slack output of ArgoCD
Section titled “Slack output of ArgoCD”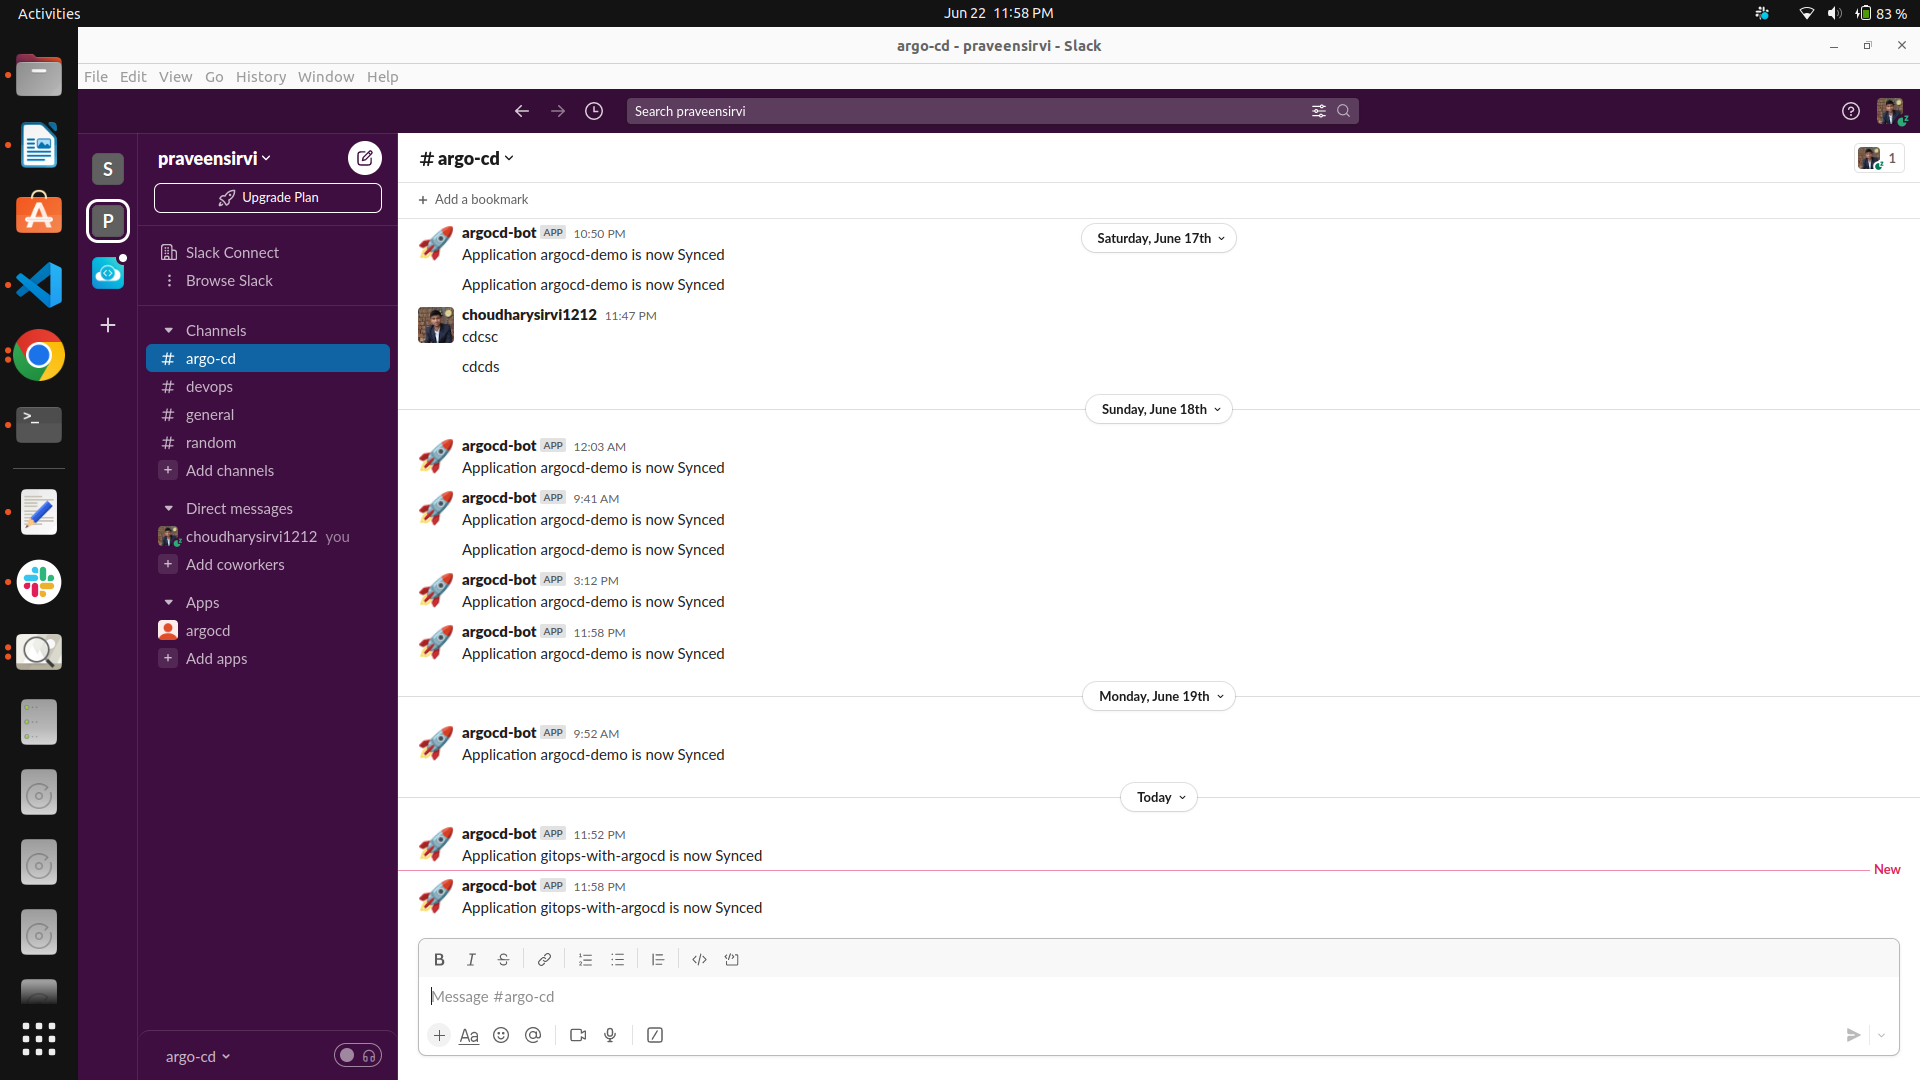
Prometheus
Section titled “Prometheus”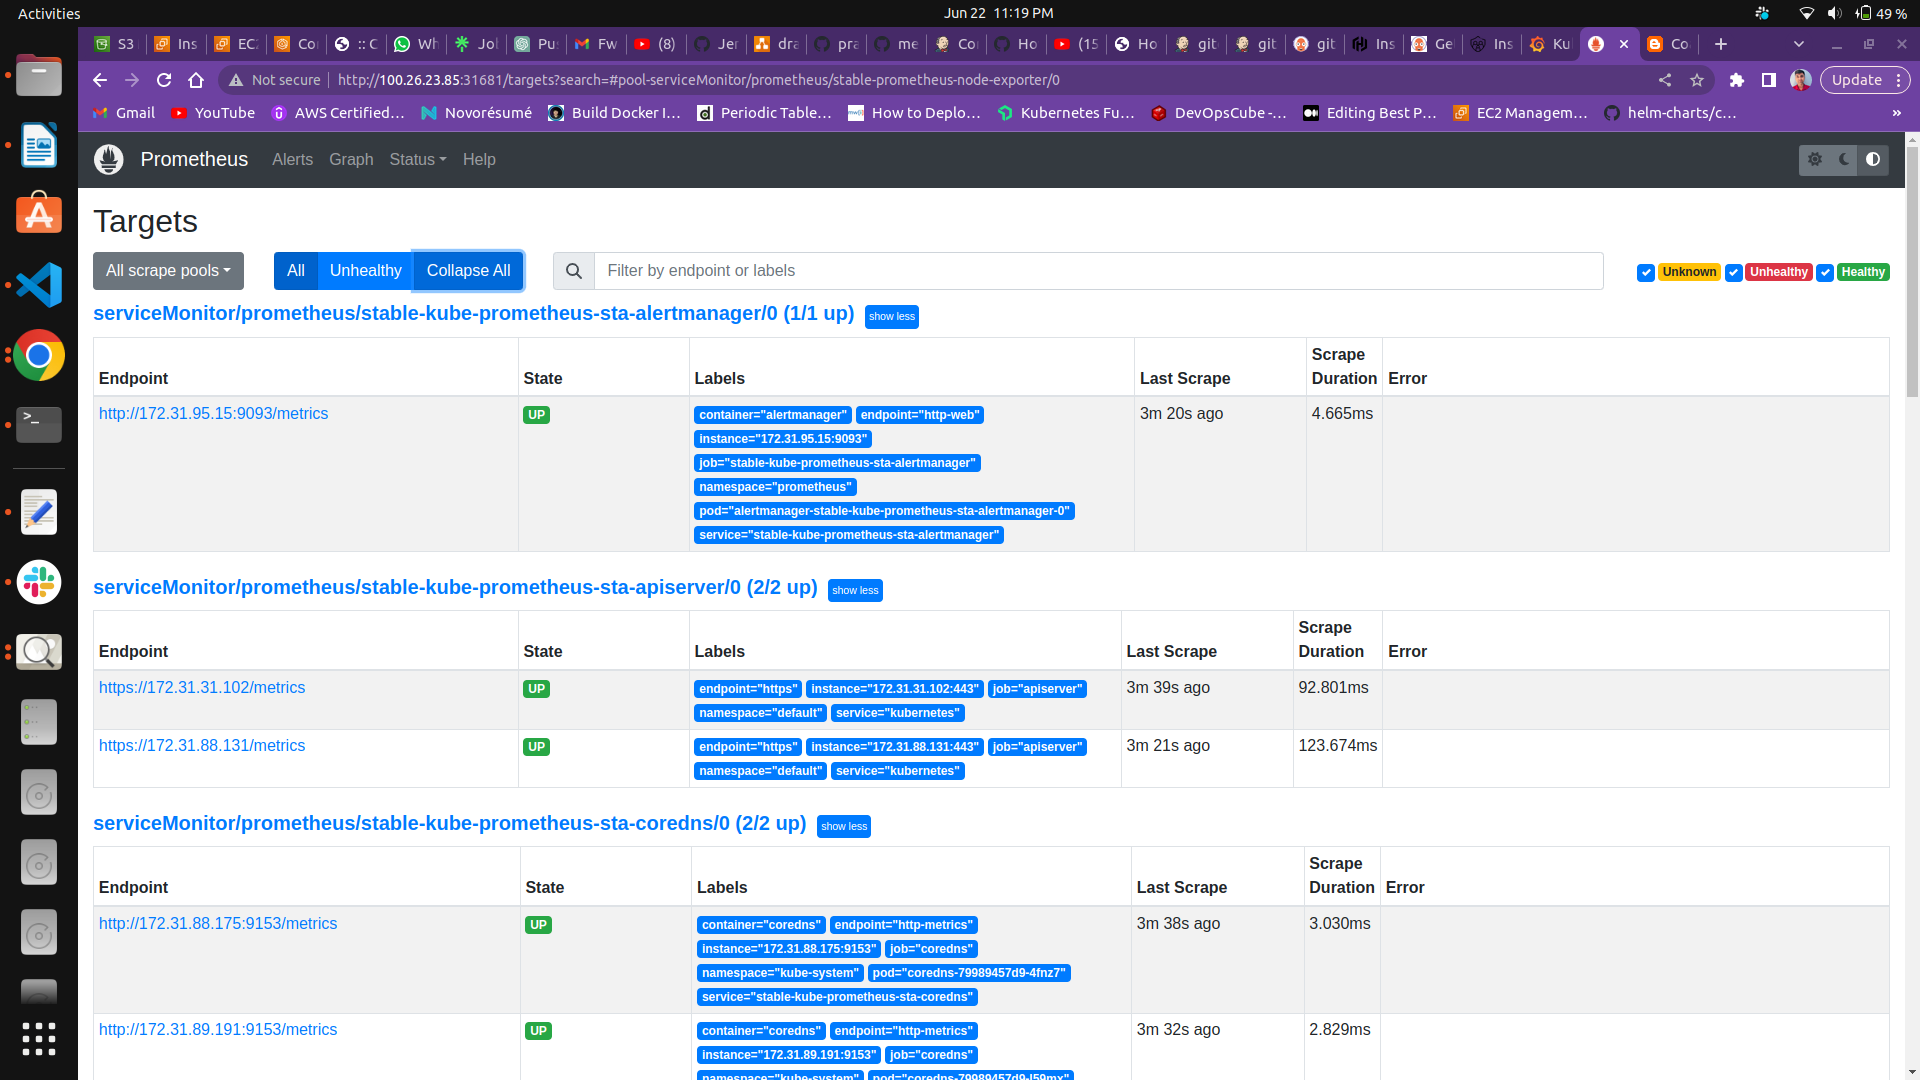
Grafana
Section titled “Grafana”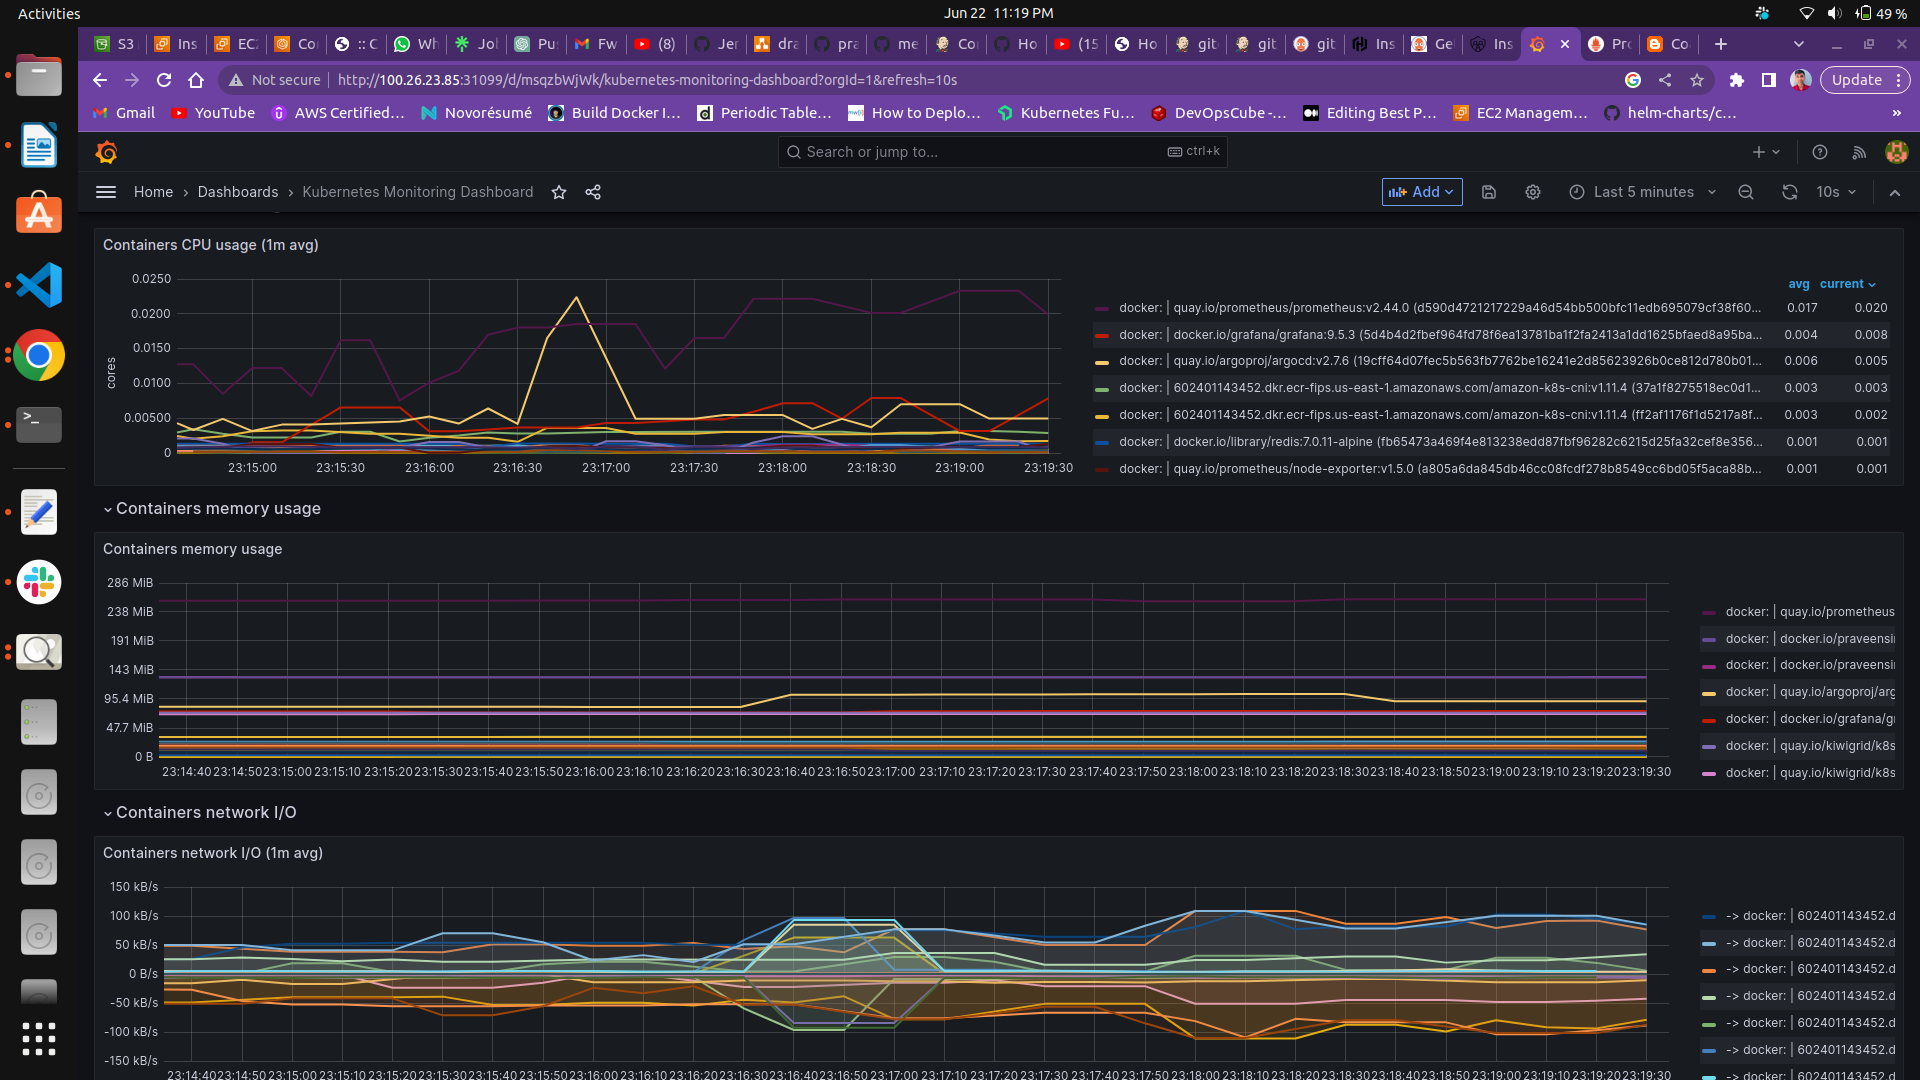
Source Files On GitHub
Section titled “Source Files On GitHub”The full learning flow stays on this page. Open GitHub only when a step asks you to inspect code, fork the lab, or download source assets.